This blog post is a little bit special to me as the whole idea and text is not coming from myself but from my good friends Dirk Gubbels, Principal Consultant at Microsoft, and Gabi Münster, Fabric CAT/Senior Program Manager as well at Microsoft. They approached me asking if I would be willing to share the solution on my blog and how can I say no to such a request? 🙂 Feeling even honored that they considered my blog for their idea, I’m happy to share their walk-through how to start a job after a Power BI Dataset has been refreshed.
In some business cases, there may be a requirement to perform a number of tasks as soon as a Power BI Dataset has been refreshed. This can be sending out an email, starting another Dataset process, or rendering and distributing reports. This blog post will show in detail how this can be done.
Requirements
For this to work, the following components will be created:
- A Power BI Report with
- A Power BI Dataset, which process will trigger the task
- A page with a card showing data related to the last refresh time
- A Power BI Dashboard with a time containing information on the time of the last refresh
- A data Alert that will trigger when the Dashboard tile changes
- A Power Automate Flow to execute the required task
Each of the components will be described in detail.
Step 1: The Dataset
Any dataset can be used for this. In this example the dataset fetches data from the public northwind OData service at https://services.odata.org/V3/Northwind/Northwind.svc/ To have a few tables and data for the report, the following model is created:
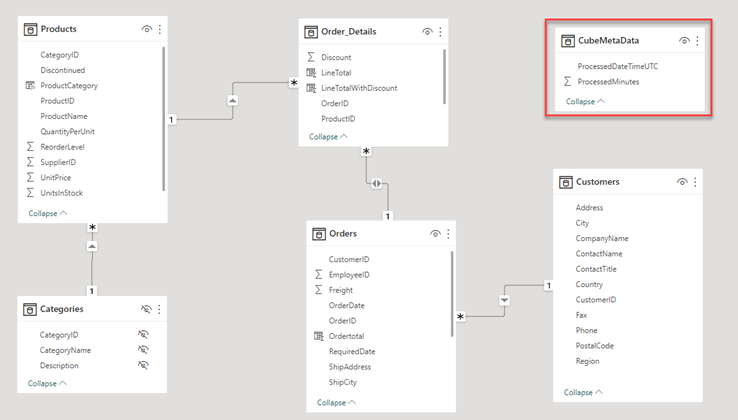
Important: To enable the rendering of the report when the Dataset is refreshed, an extra table named ‘CubeMetaData’ is created, using the following M code:
let
    Source = #table({"ProcessedDateTimeUTC", "ProcessedMinutes"}, {{DateTimeZone.FixedUtcNow(),Number.Round(Duration.TotalMinutes( Duration.From( DateTimeZone.FixedUtcNow() - DateTimeZone.From("2020-01-01 00:00:00 +00:00")))) }}),
    #"Changed Type" = Table.TransformColumnTypes(Source,{{"ProcessedMinutes", Int64.Type}, {"ProcessedDateTimeUTC", type datetimezone}})
in
    #"Changed Type"
The 2nd column is needed to set the data alert, as currently data alerts cannot be set on date or datetime values. Therefore, a column with a numeric value must be created.
Step 2: Visualizing the processed date
In the Power BI report containing the dataset, create a page with 2 card visuals, one showing the ProcessedDateTime column and one showing the ProcessedMinutes column. This can be sum or first, does not really matter as there is only 1 row anyway. Make sure the card showing the processed minutes does not use any display units. The full detail of the number needs to be visible.
The left visual will not be used, but is added for troubleshooting purposes, to see if the cube was processed.

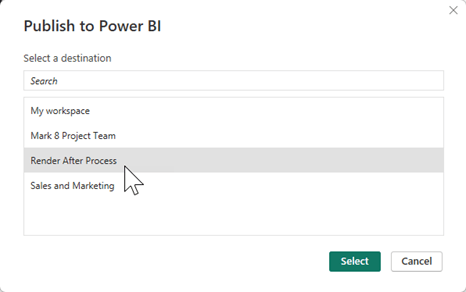
Step 3: Save and publish the report
Save the report and publish it to a workspace on Power BI.
Step 4: Create a Dashboard
The Power Automate Flow will be triggered by a data alert in Power BI. These data alerts are only available on Dashboards. So, the next step is to create a Dashboard with a single tile referring to the refresh date/time of the cube.
Open the report that was just published:

And pin the visual showing the numeric value of the processing time to a new Dashboard:

After creating the dashboard, open it.
Step 5: Create a data alert
On the Dashboard, click the ellipsis button at the top of the newly created tile showing the processed Datetime: If the ellipsis button (…) is not visible, try changing the size of the tile.
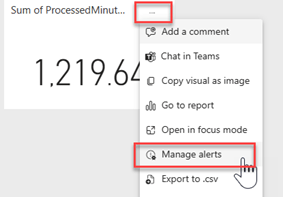
Choose ‘manage Alerts’ to create a new data alert, and click the ‘+ Add alert rule’ button. The alert should look similar to this:

The alert condition will always be true, but because the alerts are only sent when the data changes, this effectively becomes an alert sent on data change. The data will only change when the cube processes.
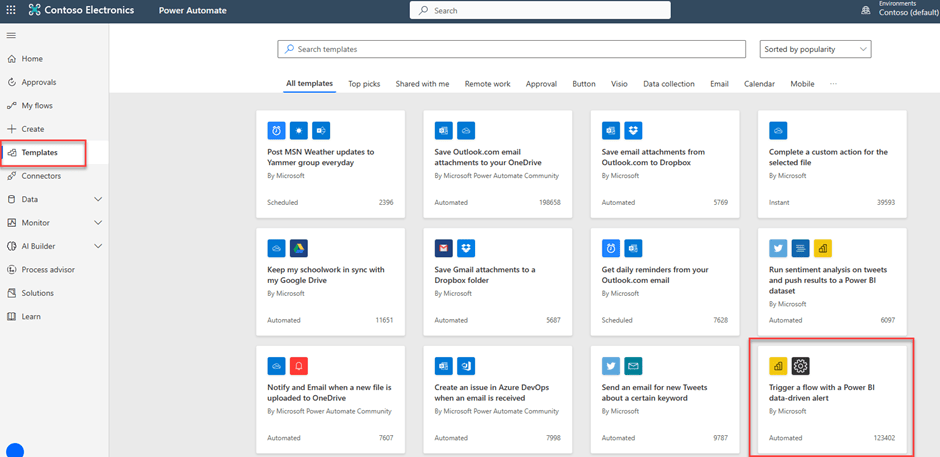
Step 6: Create the Power Automate Flow
With the data alert is set up, it is now possible to start a Power Automate Flow when the alert is triggered. To do this, either click the link at the bottom of the data alert details, or navigate to https://powerautomate.microsoft.com/
Sign in and select ‘templates’ at the left side of the screen. The template ‘Trigger a Flow with a Power BI Data-driven alert’ should appear on the bottom right of the screen. If it is not visible, just search for ‘Data driven alert’.
Select the template. On the next screen, you may be asked to validate the connection to Power BI:
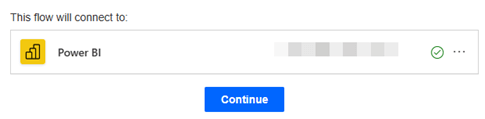
Validate this and click continue. The flow editor opens.

For this sample implementation, a simple mail alert step is added. The goal is to see that the Flow gets started when the cube is processed, a full implementation will depend on the business case. E.g. to export Paginated Reports in Power Automate, use the steps explained at Export paginated reports with Power Automate – Power BI or check out PBI Guy’s Blog post https://pbi-guy.com/2023/02/03/export-paginated-reports-automatically-in-a-low-code-way-without-power-bi-premium/
The flow looks like this:

Ensure the flow is saved.
Step 7: Testing the solution
To test the solution, process the Dataset. Before the Dataset can be processed, the credentials need to be set. In this case, we’re using an anonymous OData feed. Go to the settings of the Dataset and click ‘edit credentials’ on the data source credentials.

Once this is done, the dataset can be refreshed.

As the alert will be triggered maximum once per hour, it is best to schedule a few automatic refreshes with a few hours in between, and compare the refresh history with the flow execution history:
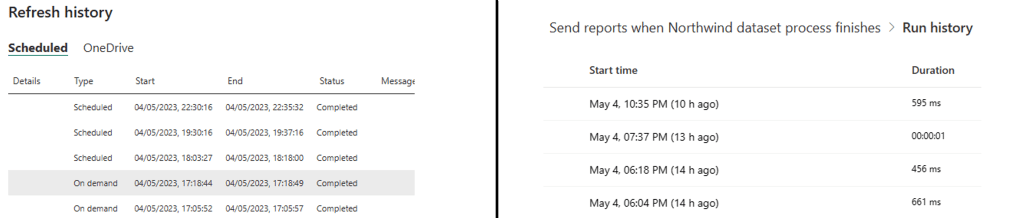
This shows there is around a 5 – 7 minute delay between the refresh finishing and the Power Automate job starting.
Alternatively, a similar result can be achieved using Scorecards and Goal instead of a Dashboard and a tile.
Add-on from PBI Guy: You could also trigger a Dataset refresh via Power Automate and use the REST API to check the status of the Dataset Refresh. Once finished, the Flow could proceed and send as well an e-mail or whatever is required. This way you would have more control over the whole process, but would require more skills to call the Power BI REST API. Lastly, you could also create more complex rules by executing DAX statement against the Dataset via the REST API or Power Automate and check tresholds in Power Automate to trigger an e-mail alert.
Limitations
Please be aware that Data Alerts currently are not triggered if you refresh the Dataset using the XMLA endpoint or the enhanced refresh API.
Conclusion
The steps above explain how to create a Power Automate Flow that is executed after a Power BI Dataset is refreshed. This opens the door for many different business scenarios of tasks that need to run as soon as new data is available in a Power BI Dataset.
Once more, thank you very much for these insights Dirk and Gabi and I hope we’ll collaborate even more in near future!
Please let me know if this post was helpful and give me some feedback. Also feel free to contact me if you have any questions.
If you’re interested in the files used in this blog check out my GitHub repo https://github.com/PBI-Guy/blog

Does ProcessedMinutes populate if the scheduled dataset refresh starts and then fails? Or does it only populate upon *successful* refresh?
LikeLike
I’m not sure as I haven’t tested it, but I guess you’ll get the ProcessedMinutes as well but it could be like 1sec if it fails right away.
LikeLiked by 1 person
I was hoping to find a way to trigger a action in Power Automate based on the dataset refresh result, either it failed or succeeded. This solution works great the capture the successful dataset refreshes as triggers, but does not capture the failures. Any chance you have tried this too?
I want to monitor how often my datasets fail, by capturing historical data for longer periods of time. For mysterious reasons, I got it failing from time to time, I need to quantify it.
LikeLike
Haven’t tried that, but the Power BI REST API offers a way to get a history: https://learn.microsoft.com/en-us/rest/api/power-bi/datasets/get-refresh-history-in-group hope you can use it to fulfill your requirements.
LikeLike
Hello,
What does “if you refresh the Dataset using the XMLA endpoint or the enhanced refresh API.” mean?
My plan is to have the base dataset refresh via schedule refresh, would that work out?
Thanks!
LikeLike
Hi
A scheduled refresh will work. Via XMLA Endpoint means if you connect for example with SQL Server Management Studio to your dataset and trigger a refresh this way, or via the Power BI REST API in a programmatically way.
Hope it helps.
LikeLike
is there any way we can get data alerts even if we trigger the dataset via the Power BI REST API ??
LikeLike
You would need to extend the Power Automate Flow by calling the REST API afterwards again, checking for the Refresh Status until it’s completed (or successful) and execute a DAX query against the Semantic Model to create your own alert on top of it. Unfortunately, not OOTB supported. Alternatively, you can also check out Data Activator within Microsoft Fabric.
LikeLike
Similar but not the same, can the rest api be used to query if the report/dataset has been not refreshed but rather changed? I have some overambitious users who are allowed to add reports to a workspace but I want to be alerted if my own “official” reports are modified. If that’s a yes, I’ll dive in to figure out how sooner rather than later.
LikeLike
Hi,
You could check the audit logs as everything is logged there (who changed what at which time). You could either extract it on your own, use Azure Log Analytics, or create alerts in M365 on certain activities.
Besides that, I would rather reconsider your permission concept. Generally speaking from what I read, I think best would be if you give only “Read” permission on your report with “Build Permission” on the underlying Semantic Model. On Top, if you distribute an app, you can give “create a copy” rights to users. This way, your original report won’t be overwritten and users are still able to create a copy / new report based on the data model.
LikeLike
Thank you, I’ll start experimenting with detailed permissions options to create some happy medium. I want them to be able to refresh the dataflows but not change them and refresh the datasets but not change them in the data workspace. I’m happy for them to copy the report in the report workspace and add their own versions or new reports but not to change the official report in the reporting workspace.
There’s only a couple users in each reporting space that are power bi literate and have accepted responsiblity as partners and are paying for premier access. I might be able to pubish the app twice, first with only view permissions for all and then separately with build permissions for just the power users.
LikeLike