As you probably know the Power BI REST API is a very handy interface to extract information in an automatic way. I showed already in different posts how to use e.g. Python and Power Automate to achieve various things (see https://pbi-guy.com/tag/power-bi-rest-api/). But did you know you can also connect with Power BI to the REST API and get e.g. an overview of all your workspaces? And even better, you can use a Service Principal to do so. Let me walk you through and explain why a Service Principal is more handy in this case.
Prerequisites
To be able to connect to the Power BI REST API there are a few things needed.
- Power BI Desktop
- a Service Principal
- Sufficient permission to call the REST API
In one of my previous posts I showed how to create a Service Principal (https://pbi-guy.com/2022/03/10/power-bi-and-activity-logs-with-python/). On top we have to make sure the Tenant setting is enabled to call the REST API with a Service Principal, see https://learn.microsoft.com/en-us/power-bi/enterprise/service-premium-service-principal
Let’s start
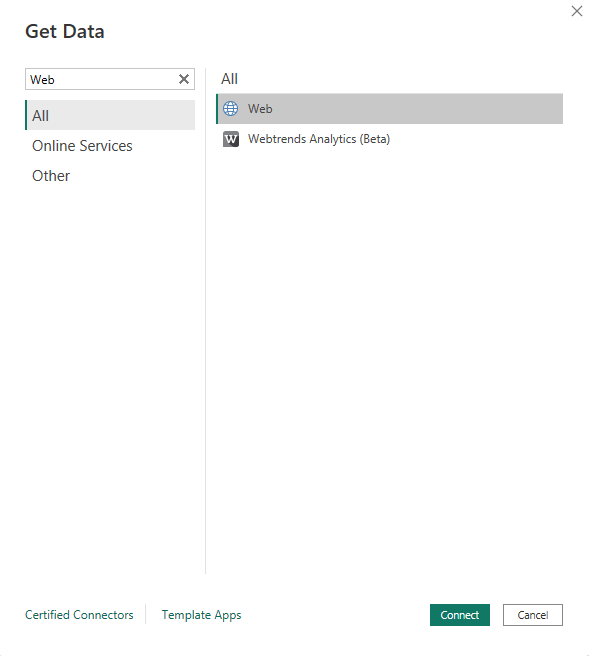
Checking the documentation, we see there is a bunch of different APIs we could call and extract various details. In my case I wish to have an overview of all Workspaces I have access to. Therefore, I’m going to use the Get Groups call. To do so, I open Power BI Desktop, choose Get Data, and select the Web connector.
Next, I add the URI (without “GET”) provided in the doc.
https://api.powerbi.com/v1.0/myorg/groups
If I would now hit OK I would get an error message saying “Access to the resource is forbidden” because we didn’t and can’t authenticate automatically to the REST API. We have to provide a so-called Bearer Token so that the REST API knows we are allowed to access it and get the details we’re looking for. But how to get one? There are two easy ways, let me show you both.
Get a Bearer Token
On one hand, you can use PowerShell to get a Token on behalf of your user. To do so, you would first need to install the Power BI PowerShell cmdlet (see here) and execute two line of code. The first line is to login to Power BI and the second one to show the Access Token as text resp. string format. If you execute it, PowerShell will automatically open a new window in which you can provide your user and credentials. Afterwards, the Token will be generated and visible in the output.

Login-PowerBI
Get-PowerBIAccessToken -AsString
On the other hand, you can also use the the Power BI REST API documentation as there is a Try It button.

Once clicked, a new window pane on the right hand side will expand where you can log in with your user. Afterwards you’ll find a Bearer Token in the HTTP request which you can copy.

Use the Bearer Token in Power BI
Now that we copied our Bearer Token, let’s switch back to Power BI and hit Advanced in the Web Connector Window pop up. As we can see in the above screen shot, the “HTTP” request includes an “Authorization” parameter with the Bearer Token. This is exactly what we have to provide as well in Power BI. Make sure “Bearer” with a space afterwards is also included.

If you copy & paste the Bearer Token from the PowerShell output make sure no “Enters” are included.
Hitting the OK button, I’ll get now an overview of all workspace I have access to (not the Service Principal, as we used our Token so far). But to be able to refresh the Report we would need to make sure the Bearer Token is newly generated and active as per default the Token expires after 60 minutes. For such a case a Power BI function comes very handy to generate a new Token each time we refresh the report. Unfortunately, there is another “but” in the current scenario. Power BI resp. Power Query can’t handle Multi-Factor-Authentication (MFA), which is best practice and enabled in my demo tenant. For such a case a Service Principal comes very handy! SPs don’t have MFA and we would be able to connect to the REST API.
Create a function to get a Token with a Service Principal
As I love to work with parameter because they make my life much easier once some changes are needed, let’s create three in this case – one for the Client ID (Service Principal ID), Client Secret, and Tenant ID which are needed to create a Token. All three are of type Text. As current value I put in the details of my Service Principal.

Next, I create a function by hitting New Source – Blank Query. Afterwards, I select Advanced Editor and paste the code below into it. In short, it’s using the three defined parameters and call the URL to generate a Token with the Service Principal we provided. As we want to connect to Power BI the Scope / Authority is also given (analysis.windows.net/powerbi/api). We use the response body to extract the Access Token out of it and save it into our last step “Bearer”

() =>
let
   TenantGUID = paramTenantID,
   ApplicationID=paramClientID,
   ApplicationSecret=paramClientSecret,

   OAuthUrl = Text.Combine({"https://login.microsoftonline.com/",TenantGUID,"/oauth2/token"}),
   ClientId = Text.Combine({"client_id",ApplicationID}, "="),
   ClientSecret = Text.Combine({"client_secret", Uri.EscapeDataString(ApplicationSecret)}, "="),
   GrantType = Text.Combine({"grant_type", "client_credentials"}, "="),
   Body = Text.Combine({"resource=https://analysis.windows.net/powerbi/api", ClientId, ClientSecret, GrantType}, "&"),

   AuthResponse= Json.Document(Web.Contents(
       OAuthUrl,
       [
           Content=Text.ToBinary(Body)
       ]
   )),

   AccessToken= AuthResponse[access_token],
   Bearer = Text.Combine({"Bearer", AccessToken}, " ")

in
   Bearer
Before I continue, I rename the function to fnGetToken. Once done, my last step is to make sure the “groups” table will call the function to generate a Token every time I refresh my Power BI report. To do so, I select the table, hit Advanced Editor, and replace everything between the quotation marks as well as the quotation marks itself with the function fnGetToken()

That’s already it! If everything done correctly, the table should already be updated with all the Workspaces the Service Principal has access to. To make sure that it works, you can hit the Refresh button.
If the table is now empty, this means the Service Principal wasn’t added to any workspace. Make sure to add the Service Principal to each workspace you wish to see.
That’s already it! This way, you can call all “GET” REST APIs from Power BI with a Service Principal.
Keep in mind this way you are exposing the Service Principal ID as well the secret. Unfortunately, there is no way to hide or anonymous this info or parameter in Power BI.
Please let me know if this post was helpful and give me some feedback. Also feel free to contact me if you have any questions.
If you’re interested in the files used in this blog check out my GitHub repo https://github.com/PBI-Guy/blog
