How to Refresh a Power BI Semantic Model from SharePoint Using a Fabric Workspace Identity

One of the questions I recently received was whether it’s possible to refresh a semantic model connected to a SharePoint site without using a personal account, stored credentials, or a traditional Service Principal.

The answer is: Yes.

With Microsoft Fabric Workspace Identity, you can authenticate directly against SharePoint using an automatically managed service principal. Combined with Sites.Selected, this provides a secure, least-privilege approach that avoids granting tenant-wide SharePoint permissions while still enabling scheduled refreshes. Workspace Identity is an automatically managed service principal associated with a Fabric workspace and can be used for authentication scenarios across Fabric items.

In this blog post, I’ll walk you through the complete setup. The same walk-through can be used for a Service Principal, but I’d highly recommend using a Workspace Identity as it’s much easier to manage.

Why Use a Workspace Identity?

Traditionally, Power BI Semantic Models connected to SharePoint are often refreshed using user credentials. While these approaches work, they are not always ideal from a governance and security perspective. A Workspace Identity gives you:

  • No credential management
  • Automatic secret rotation handled by Microsoft
  • Clear ownership tied to the Fabric Workspace
  • Support for least-privilege access using Sites.Selected
  • Better alignment with enterprise security requirements

When a Workspace Identity is created, Fabric automatically creates a corresponding App Registration and Service Principal in Microsoft Entra ID and manages the credentials for you.

Step 1: Create a Workspace Identity

Navigate to your Fabric workspace and open: Workspace Settings → Workspace Identity

Click:+ Workspace Identity
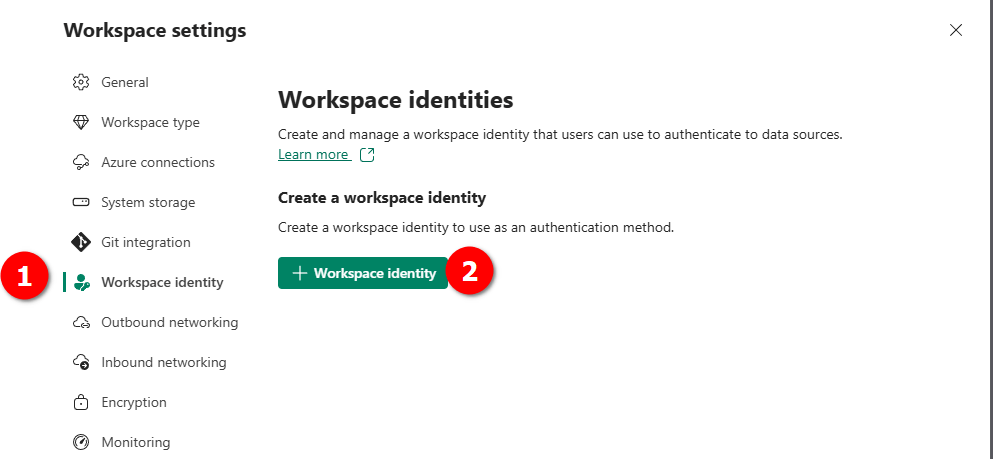
Once created, you’ll see details such as:

  • Name
  • Identity ID
  • State

The identity name automatically matches the workspace name. Fabric also creates a corresponding App Registration and Enterprise Application in Microsoft Entra ID. You can verify this by opening: Microsoft Entra ID → App Registrations and searching for your workspace name.
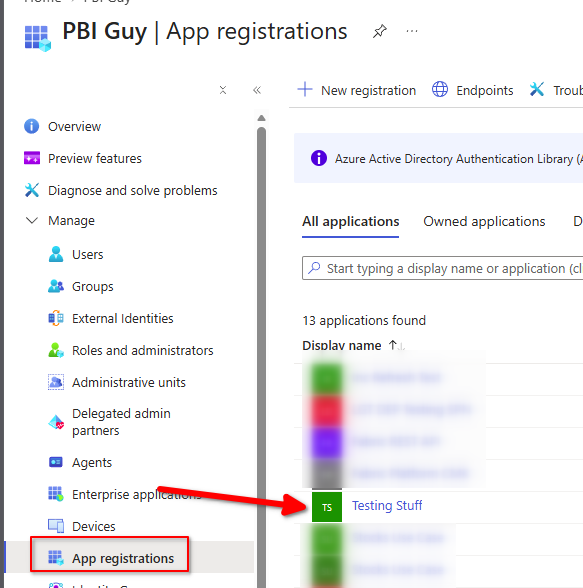
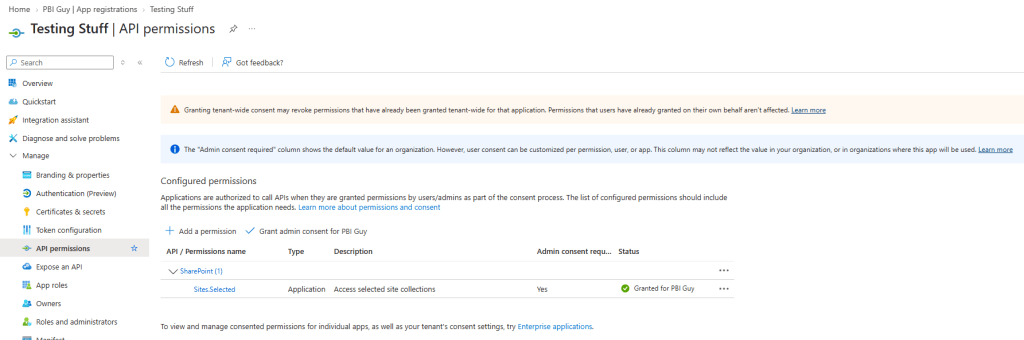
Step 2: Configure SharePoint Permissions

At this stage, the Workspace Identity exists but has no access to SharePoint. Many examples online use: Sites.Read.All in the API Permissions section. However, this grants access to all SharePoint sites in the tenant. Instead, I highly recommend using: Sites.Selected which follows the principle of least privilege.

Add the following permission to the Workspace Identity application:

SettingValue
APISharePoint
Permission TypeApplication
PermissionSites.Selected
Admin ConsentRequired

Important: For the SharePoint connector used by Power BI and Fabric, the SharePoint API permission is required. A Microsoft Graph Sites.Selected permission is not needed unless you intend to directly access SharePoint through Microsoft Graph APIs.

Step 3: Retrieve the SharePoint Site ID

Since Sites.Selected provides no access by default, you must explicitly grant access to the target SharePoint site. As there is no nice UI to do so easily, we go through REST APIs. For that, I leverage the Microsoft Graph Explorer as you can easily login through the website and just execute REST APIs against Graph API.

GET https://graph.microsoft.com/v1.0/sites/{tenant}.sharepoint.com:/sites/{SiteName}
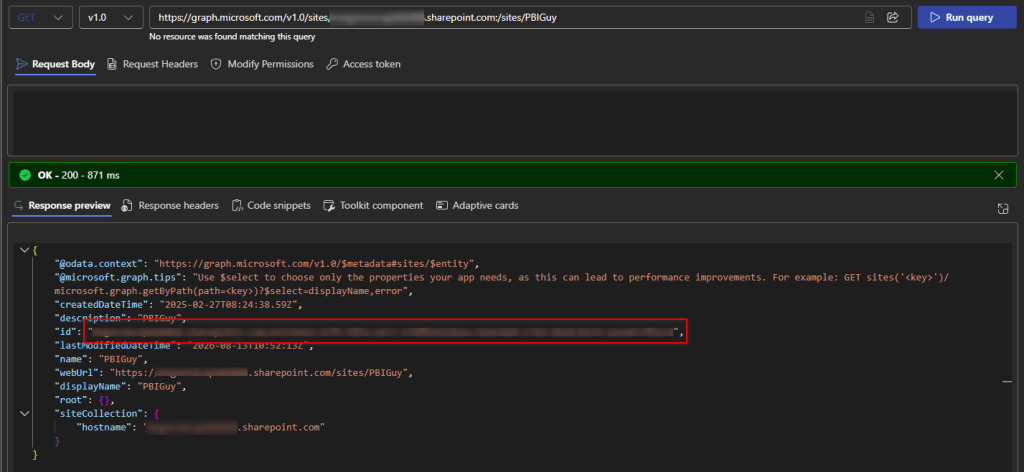
The response will contain the Site ID. Save that value for the next step.

Step 4: Grant the Workspace Identity Access to the Site

Now grant the Workspace Identity access to the specific SharePoint site. Execute the following Graph API request:

POST https://graph.microsoft.com/v1.0/sites/{site-id}/permissions

Request Body:

{
"roles": ["read"],
"grantedToIdentities": [
{
"application": {
"id": "<Workspace Identity Client ID>",
"displayName": "<Workspace Identity Name>"
}
}
]
}

Note: If you wish to use a Service Principal instead of a Workspace Identity, paste the Service Principal Client ID in the “ID” field instead of the Workspace Identity one.
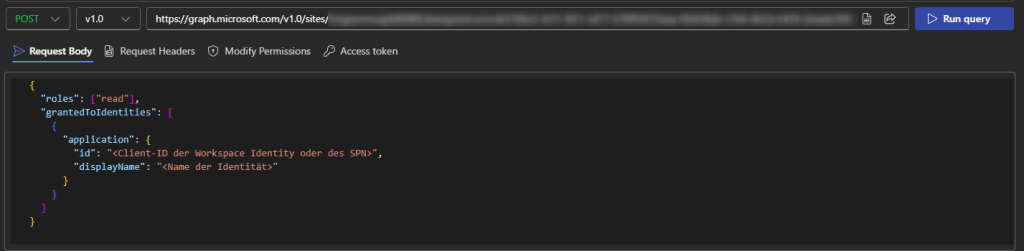
This grants the Workspace Identity read access to the specific SharePoint site and nothing else. A nice benefit of this approach is that security teams often prefer it over tenant-wide access because permissions remain scoped to a single site.

Step 5: Verify the Permission

To confirm the permission assignment, query the site again:

GET https://graph.microsoft.com/v1.0/sites/{tenant}.sharepoint.com:/sites/{SiteName}
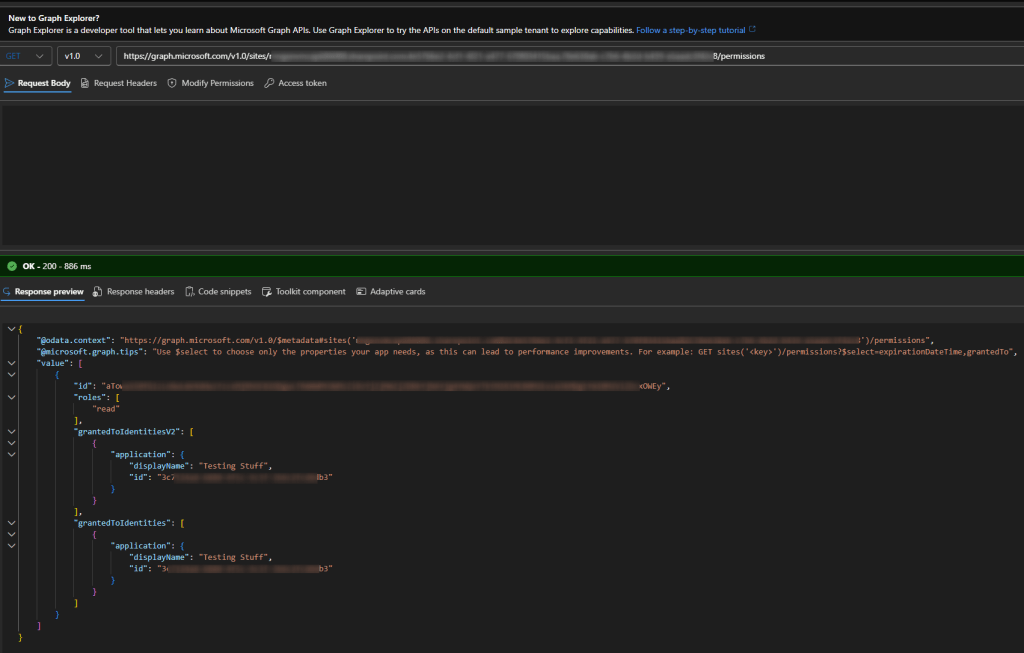
Alternatively, your SharePoint administrator can review the permissions directly through administrative tooling.

Important: To perform the permission assignment, the administrator executing the Graph request requires: Sites.FullControl.All
This is only needed temporarily for the administrative session and does not need to be assigned to the Workspace Identity itself.

Step 6: Create the Fabric Connection

Now switch back to Fabric. Create a new SharePoint connection using the SharePoint URL. When selecting the authentication method, choose: Workspace Identity
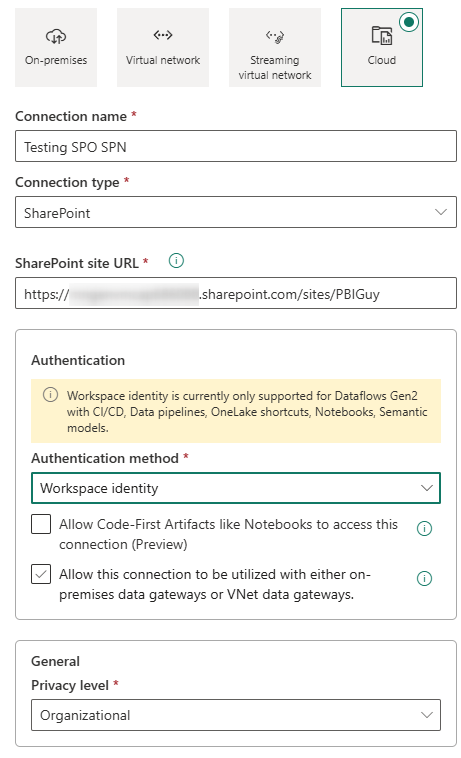
Fabric supports using Workspace Identity as an authentication mechanism for supported connection scenarios and items, including Semantic Models.

Step 7: Publish and Refresh the Semantic Model

Lastly, you have to bind the connection to your Semantic Model. To do so, publish your semantic model to the workspace. Afterwards, open: Semantic Model → Settings → Data Source Credentials and select as Authentication method: Workspace Identity Test it out by running a manual refresh.
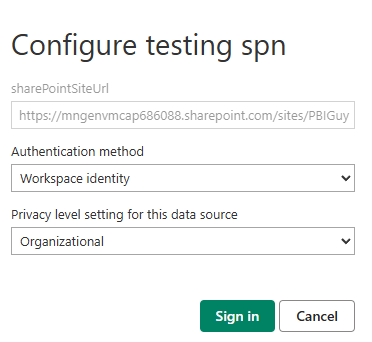
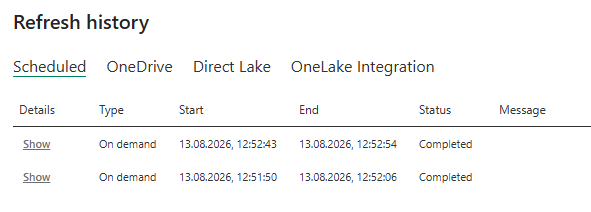
If the SharePoint permissions and connection are configured correctly, the refresh should complete successfully without requiring any user credentials.
Final Thoughts

Workspace Identities are quickly becoming one of my favorite Fabric capabilities. They remove the operational burden of managing Service Principal secrets while enabling secure, enterprise-grade authentication patterns. Combined with Sites.Selected, they provide a clean least-privilege solution for SharePoint-based datasets and semantic models.

If you’re currently refreshing SharePoint-based Power BI Semantic Models using personal accounts or broad SharePoint permissions, it’s definitely worth taking a look at Workspace Identity as a more scalable and secure alternative.

Have you already started using Workspace Identities in Microsoft Fabric? I’d love to hear about your experiences and scenarios in the comments.
Show “secured” Images in Power BI

Use Case

From time to time I got asked how you can display images in Power BI. The answer is pretty simple and straight forward (see https://docs.microsoft.com/en-us/power-bi/create-reports/power-bi-images-tables) if the image is publicly available. But customers can’t expose their internal pictures to the public and still want to display them in Power BI. The issue is with “secured” images that the Power BI visual can’t log in with an account to be able to display it. So how can you still save your images in a secured environment and still display them in Power BI? Let’s check it out.

I tried different ways and found two that work. One would be to get the binaries of each image, transform it to a text field and display afterwards with a custom visual the image. This solution has a big “but” from my point of view. Because the text field has a 32766 character limit you would either have to resize your image or you have to do some Power Query and DAX magic to split the field into multiple ones and add them afterwards together again. Chris Webb wrote a blog how this could be done here: https://blog.crossjoin.co.uk/2019/05/19/storing-large-images-in-power-bi-datasets/

As good as this solution might be I would like to find an easy, low-code / no-code way to achieve the same. And luckily there is one!

Power Apps & Power BI – Better Together

Because Power BI is part of the Power Platform and Microsoft offers a seamless integration into the other Services (and vice versa) let’s leverage the benefits of it and try to display our images through a Power Apps app in Power BI.

Prerequisites

To be able to implement the solution you would need a few things:

  • Power BI Desktop
  • Power BI Service Account (optionally)
  • Power Apps Account
  • SharePoint Document Library with pictures

The Power BI Desktop can be downloaded for free through the Power BI website. Power Apps is included in different licensing options like E3 or E5. In our case we’re going to use a SharePoint Connector which is a Standard Power Apps connector meaning no additional licensing is needed. If you don’t have a Power Apps license yet you can sign up for a Developer Plan and use to for development purpose. Keep in mind that you can’t share your apps created with a Dev. Plan nor can you show Power Apps apps in Power BI coming from this specific environment.

How to

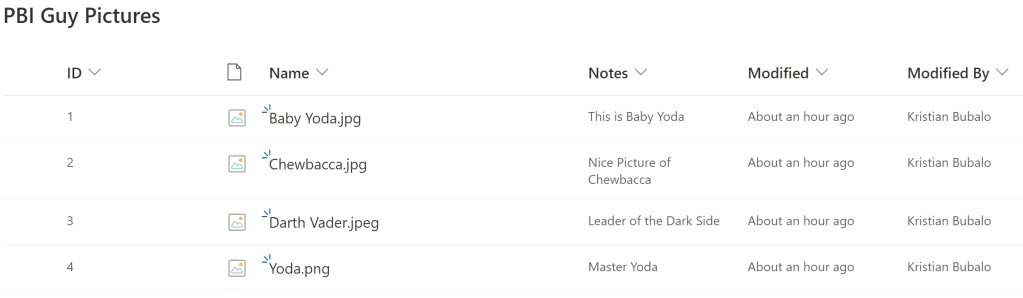
We start in Power BI Desktop and connect to our SharePoint list to get a few basic details. I’ll not guide you through how to connect to a SharePoint Document Library. These details can be found here. In my case I have a simple Document Library with some Star Wars picture.

In Power BI I connect to the Document Library and get only the ID, Notes, Created, Modified, and ServerRelativeURL fields. You can of course select more or less fields but make sure you get the ID which will be needed later on in the Power Apps app.

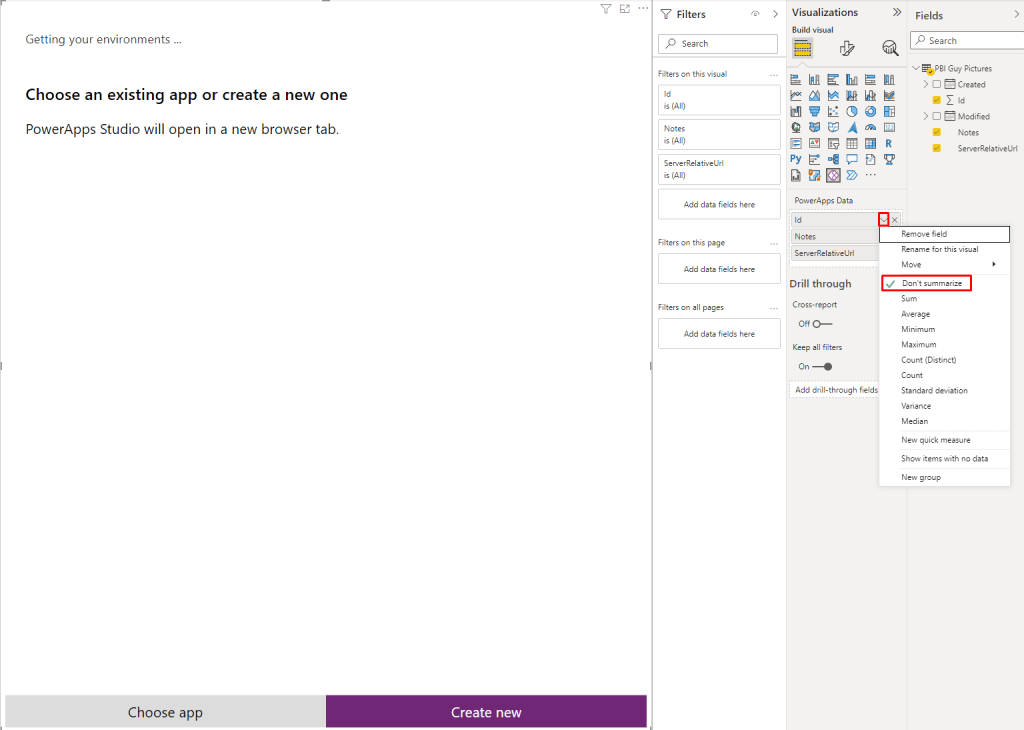
Once loaded I create a simple Table visual with the three fields ID, Notes, and ServerRelativeURL to display some data. As a next step I add the Power Apps Visual to my canvas and position it to the right. Once you added the Power Apps Visual you’ll see the necessary steps how to get started.

So let’s do our first step and add our wished fields to the data section of the visual. This fields can be accessed later on through Power Apps. Make sure to add the Id field and also check that it doesn’t summarize! The behavior (Sum, Count, etc.) will be provided to Power Apps and we don’t want to summarize our Ids. As soon as you add your first field the Power Apps visual will change where you can choose and existing app or create a new one. In our case we’re going to create a new one. A window will pop up asking if it’s ok to open your browser with the Power Apps URL. Hit OK.

Tip: If you’re facing some issues while opening Power Apps or you can’t choose your environment through the Visual, open Power Apps in your default browser, choose your environment in the browser, switch back to Power BI and try to hit the “Create New” button again.

Once Power Apps is loaded you’ll see an object call “PowerBIIntegration” (besides some others). This object has been automatically created through Power BI and makes sure that Power BI and Power Apps can interact with each other. This means for example if you select now a specific image to filter the same filter will also apply in Power Apps. That’s the reason why you have to start from Power BI and create an App from there. Otherwise the “PowerBIIntegration” object will not be created.

Let’s quickly test if the integration really works. I select the Baby Yoda picture in Power BI and the list is automatically filtered in Power Apps – great!

Our next goal is now to show the Images from SharePoint in our Power Apps app and make sure the integration still works (filter on a specific image in Power BI should also filter the Image in our app). Therefore we first have to create a connection to our SharePoint list. To do so go to the Data Tab in Power Apps and add SharePoint as data source.

If you haven’t created a connection yet hit the “Add a connection” button. In my case I can choose an existing one.

Afterwards choose your Site and Document Library in which you stored your pictures. In my case I have a Doc Library called PBI Guy Pictures. I select it and hit “Connect”.

Now that we’re connected to our Doc Library we can display the images out of it. To do so insert a Gallery. I choose a vertical one but the layout can be modified afterwards as well.

Once inserted I adjust the two Galleries so that our freshly inserted one is at the top and at the bottom I display the first Gallery. Per default our new Gallery shows default text and images. We have to connect our Gallery to our SharePoint Doc Library and than decide what we wish to display. So let’s connect it by selecting the Gallery and set the Data source through the Properties pane.

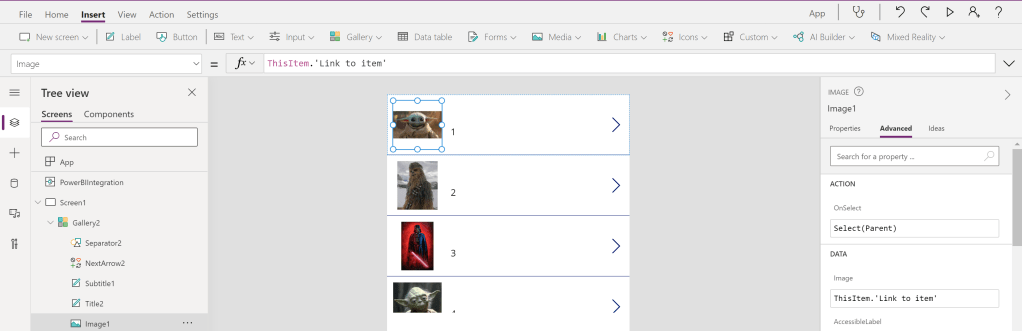
Our next step is to display the right image. Select the first image object in the Gallery and choose the “Items” property either on top left of the screen or find it in the properties pane in the Advanced section.

Replace “SampleImage” with ThisItem.’Link to item’ to create the link to our needed image.

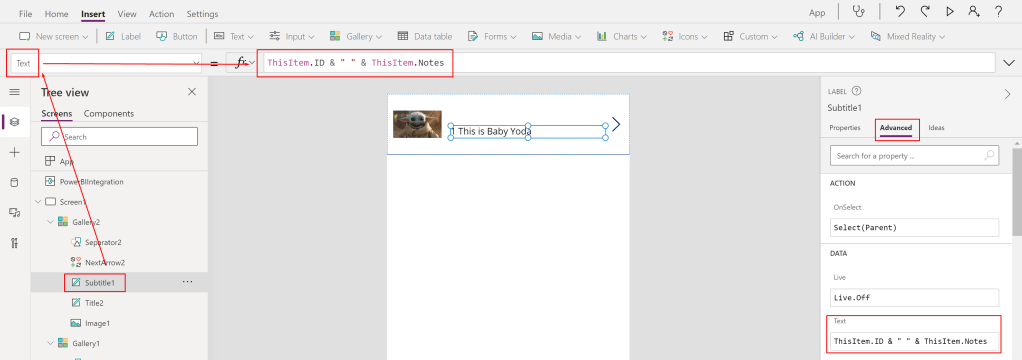
You can also modify the view of the Gallery, add new fields into it, etc. but in my case I just want to display my notes with the ID together. Therefore I select the ID Text Box and change the code in the function window from ThisItem.ID to ThisItem.ID & ” ” & ThisItem.Notes

Our last step is to create a connection between our SharePoint Gallery and the “Power BI Gallery” from the beginning so that filters from Power BI will effect our SharePoint Gallery as well. The best way to do so is to filter the new Gallery by an ID to make sure we got that one specific image we’re looking for. That’s the reason why we need our ID field from the beginning! 🙂

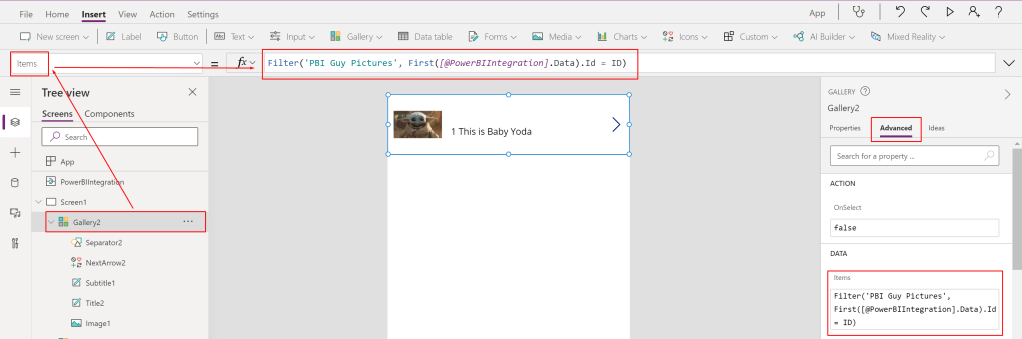
To filter the new Gallery select it and choose the Items property. In my case I see ‘PBI Guy Pictures’. This is the whole table we have to filter and making sure that only the selected ID is showing up. Therefore we wrap our Table with a Filter() statement. Our first argument in the filter statement is the ‘PBI Guy Pictures’ table. Our second argument is the filter condition which should point the ID field from Power BI to the ID field of SharePoint. Therefore we use the PowerBIIntegration object to grab the necessary data. Unfortunately this is a Table Data Type and we can’t match Table with a single Number Data Type. To get a single value I extract just the first value of the whole table with the First() statement followed with the column I’m looking for (ID in this case). Our whole function looks now as following: Filter(‘PBI Guy Pictures’, First([@PowerBIIntegration].Data).Id = ID) And I immediately see that it works! Previously I selected Baby Yoda and now only this picture is showing up.

As a last step I want to make sure the first Gallery is not visible in my app. So I select the first Gallery and set the Visible property to false.

Of course you can now modify your app and make it more shiny but just for the demo purpose I save it as it is now through File, Save. Once done the App is ready to be used in Power BI as well and the cross-filter works!

If you wish to share the report make sure all users have also access to the Power Apps app and the SharePoint Library. Otherwise people won’t be able to see the pictures in their report.

Please let me know if this post was helpful and give me some feedback. Also feel free to contact me if you have any questions.

If you’re interested in the files used in this blog check out my GitHub repo https://github.com/PBI-Guy/blog