Recently, I got a very interesting challenge from a customer of mine. In their use case, they have created a Power BI Report (and Dataset) in DirectQuery mode. On top, they have created a Paginated Report on the same Dataset, and integrated the pixel-perfect report through the out-of-the-box Paginated Report visual. Lastly, to improve performance, they used Dynamic M Parameters in Power BI to influence the query send back to Power BI. If you’re not familiar with this approach, Microsoft has a great documentation here: https://learn.microsoft.com/en-us/power-bi/connect-data/desktop-dynamic-m-query-parameters Now, they wish to pass the selected filter from Power BI to the Paginated Report within the Visual but unfortunately it’s failing with an error message like “You have attempted to pass an invalid parameter”. Let me explore what exactly is happening and how to resolve the issue in this blog post.
Prerequisites
In this scenario we need quite a few things:
- A database which is DQ supported. In my case I’m going to use an Azure SQL DB
- Power BI Desktop
- Power BI Report Builder
- Power BI Service
- Power BI Pro license
- M / Power Query know how
Setting up the environment
As mentioned, I’m going to use an Azure SQL DB on which I have a an AdventureWork Database 2019. In there, I’m going to connect to the SalesLT.Product table in DirectQuery mode from Power BI.
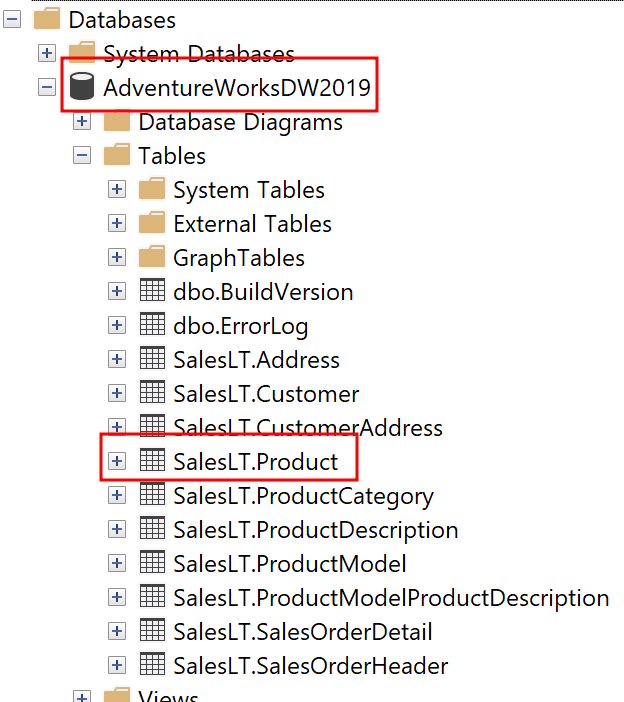
To do so, I select the Azure SQL Database Connector, pass my Server and Database name, choose DirectQuery, and past a simple SELECT statement in the Advanced Options.

SELECT p.[ProductID]
      ,p.[Name]
      ,p.[ProductNumber]
      ,p.[Color]
      ,p.[StandardCost]
      ,p.[ListPrice]
      ,p.[Size]
      ,p.[Weight]
      ,p.[ProductCategoryID]
      ,p.[ProductModelID]
      ,p.[SellStartDate]
      ,p.[SellEndDate]

FROM [SalesLT].[Product] p
Before loading my data, I hit the transform button to switch to Power Query. In there, I want to parametrize the Server and DB name. Further, for my test purpose, I want to use the dynamic M Parameter and pass the Product Number into my M. For that reason I create three Parameters in total using the CA-1098 value as current for my product number.

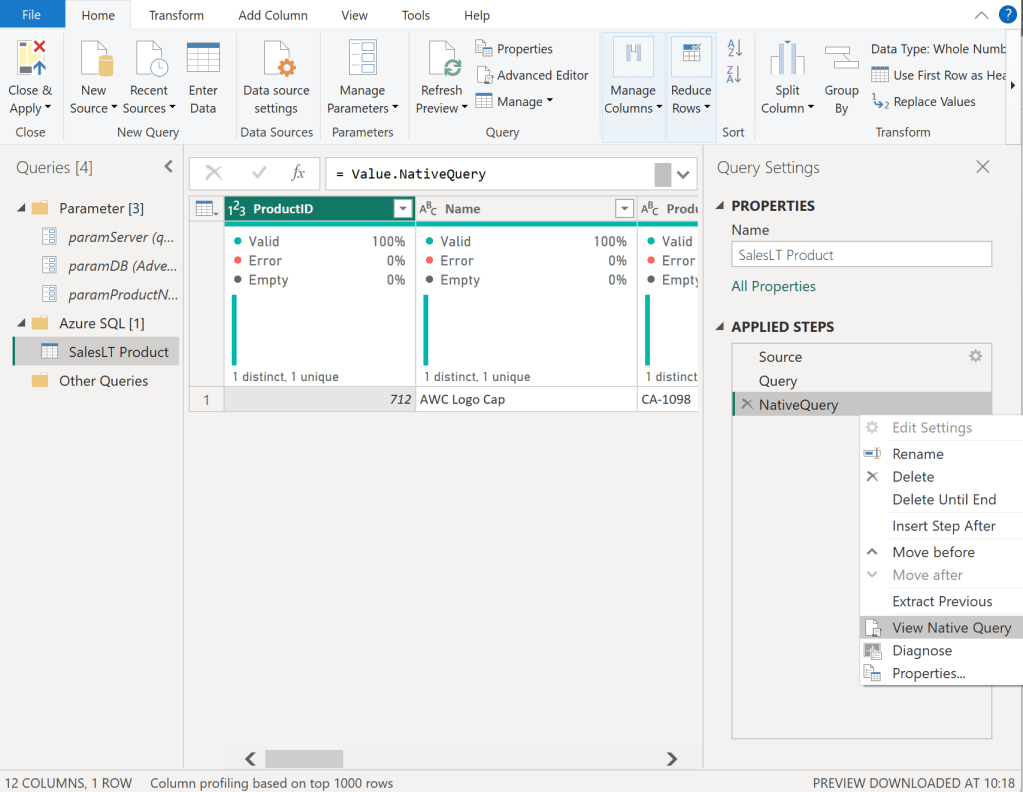
Once done, I select my Sales Table and right click on the “Source” step on the right hand side. In there, I can see that Native Query is greyed out and therefore not enforced. As we need Native Query folding, we have to customize our M a little bit. If you’re not familiar with Native Query folding, I can recommend the official Microsoft Documentation found here: https://learn.microsoft.com/en-us/power-query/native-query-folding

For some data sources the View Native Query is always greyed out as Power Query can’t identify if it is enabled or not. To make sure if Native Query Folding is enabled, trace your data source and see what query has been executed on it. Additionally, you can use Value.Metadata function in M to check if “IsFolded” is set to true or not.
Now, I switch to the Advanced Editor of Power Query and customize my code to, on one hand, use the Server and DB parameters, and enforce Native Query folding on the other hand.
In the screen shot below, you can see how I use my two parameters in the Sql.Databasse function of my first Source step. Afterwards, I created a new step called Query and pasted my SQL statement in there. I want to raise your attention to the WHERE clause here in which I point to my Product Number parameter with the default value “CA-1098” right now. Lastly, I have a third step called NativeQuery in which I enforce the Native Query folding by passing the Source, Query, and enforce it by setting EnableFolding to true.

let
    Source = Sql.Database
            (
                paramServer,
                paramDB
            ),
    Query = "
            SELECT p.[ProductID]
                ,p.[Name]
                ,p.[ProductNumber]
                ,p.[Color]
                ,p.[StandardCost]
                ,p.[ListPrice]
                ,p.[Size]
                ,p.[Weight]
                ,p.[ProductCategoryID]
                ,p.[ProductModelID]
                ,p.[SellStartDate]
                ,p.[SellEndDate]

            FROM [SalesLT].[Product] p

            WHERE p.[ProductNumber] = '" & paramProductNumber & "'",
    NativeQuery = Value.NativeQuery
                    (
                        Source,
                        Query,
                        null,
                        [EnableFolding = true]
                    )
in
    NativeQuery
Now, my table shows only one row for the CA-1098 Product Number an Native Query is enabled.
Before we close Power Query, I need an additional table to list all my Product Numbers. For that, I just duplicate the SalesLT Product table, rename it to Product Number, and adjust the SQL Statement to a SELECT DISTINCT.
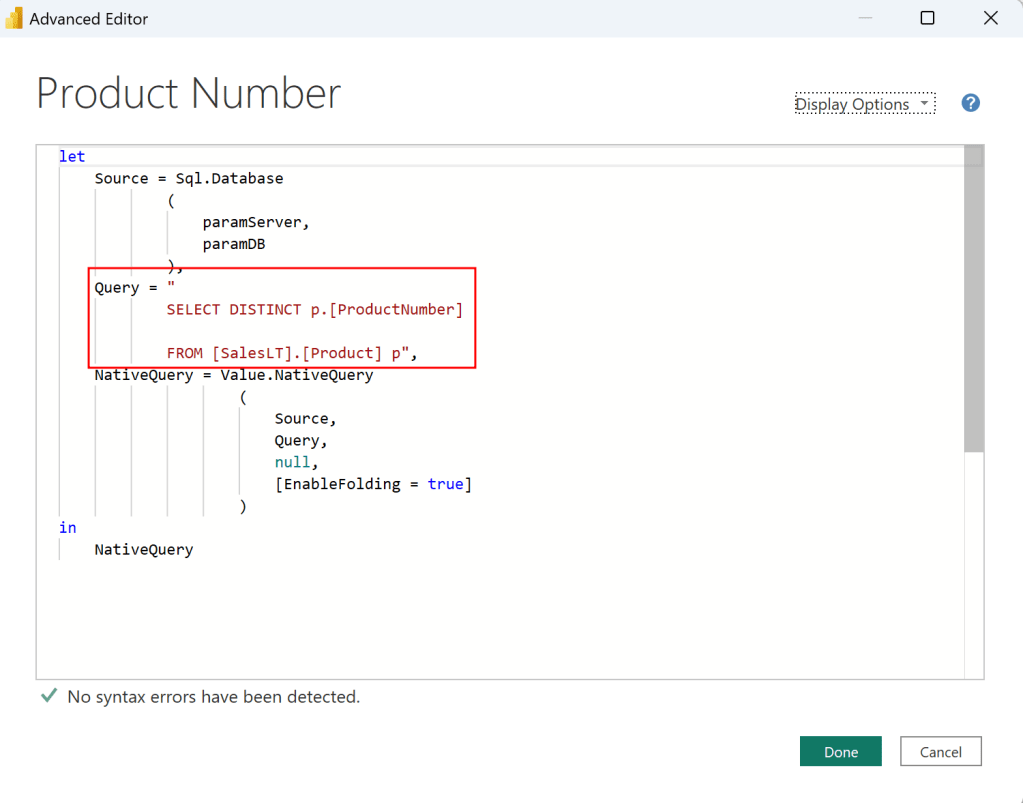
let
    Source = Sql.Database
            (
                paramServer,
                paramDB
            ),
    Query = "
            SELECT DISTINCT p.[ProductNumber]

            FROM [SalesLT].[Product] p",
    NativeQuery = Value.NativeQuery
                    (
                        Source,
                        Query,
                        null,
                        [EnableFolding = true]
                    )
in
    NativeQuery
Now I can hit the Close & Apply button. Once loaded, I switch to the Model view, select the ProductNumber column from the Product Number table, enhance the advanced options, and choose to bind this field to the paramProductNumber parameter. Pay attention that the two tables are not connected via a relationship in my model.

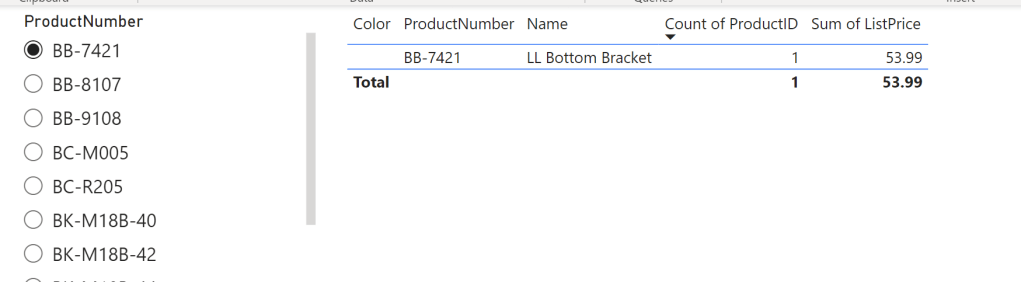
I hit continue on the potential security risk message that pops up next. Let’s test if it works by switching the view to Report View, add a slicer visual with the ProductNumber field from the Product Number table, and add a table visual with some columns from the SalesLT Product. After selecting a Product Number in our Slicer, we see the corresponding item in our table – it works!
Next, I publish the Report and create a Paginated Report on top of the newly created Dataset. The report itself is pretty simple, including just one Table with four columns. The Data Source is my freshly created Power BI Dataset.
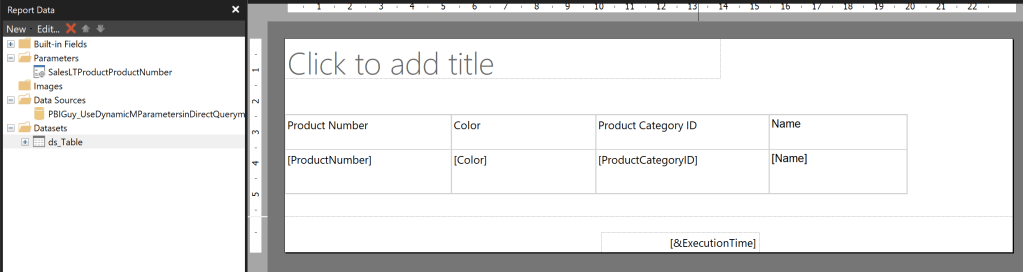
I created the Paginated Report Dataset through the Query Designer in following way and selected the Parameter Checkbox for ProductNumber.

Once the Dataset and Parameter have been created, I open the properties of the Parameter. In there, I make sure I don’t provide any default value as it’s not needed. Further, I make allow Multiple Values making sure I don’t have to change it later on as I wish to pass multiple Product Numbers in a later stage.

Now, when I run the Report and select CA-1098 it works and renders my table. But there is one big but right now. I only see one value in my drop down list.

The reason might not seen obvious at the first sight but it’s very reasonable at the end. Because I provided a default value in my Power BI Dataset it filters automatically down to just this one value. Paginated Report on the other hand only can render what the PBI Datasets provide, therefore I have to make sure to load everything somehow in Power BI Dataset while the filter / parameter still have to work. Nevertheless, let’s test the Paginated Report in Power BI through the out of the box visual to see what will happen. To do so, I publish the Paginated Report to Power BI Service, switch back to Power BI Desktop and add the Paginated Report Visual into it. I add the ProductNumber field to the visual, hit Connect to Report, select my newly published Paginated Report, and hit Set Parameter. In there, I configure the Power BI field to map to my Parameter and hit See Report.

As expected, I get an error. The reason is I try to pass the “BB-7421” value to Paginated Reports, but it’s only aware of the “CA-1098” and therefore it throws an error.

Let’s fix it in my WHERE clause of the SQL Statement in which I filter down to get only one value right now. I need a way to pass “All” as default value to get all values back but once I select a value in my slicer, it should filter it down. On top, it should be multi value aware. For that, I adopt the SQL statement in SQL Server Management Studio and replace the = with “IN” and set the statement in brackets. Further, for testing purpose in SSMS, I declare a parameter and set it to “All”. Lastly, I create a CASE statement in which I check if the parameter is All and if so, then all values from ProductNumber column should be selected, otherwise only the value itself should be taken.

DECLARE @selectedProductNumber VARCHAR(50) = 'All';

SELECT p.[ProductID]
,p.[Name]
,p.[ProductNumber]
,p.[Color]
,p.[StandardCost]
,p.[ListPrice]
,p.[Size]
,p.[Weight]
,p.[ProductCategoryID]
,p.[ProductModelID]
,p.[SellStartDate]
,p.[SellEndDate]

FROM [SalesLT].[Product] p

WHERE p.ProductNumber IN (CASE WHEN @selectedProductNumber = 'All' THEN ISNULL(ProductNumber, '') ELSE @selectedProductNumber END )
After testing if the SQL statement works as expected by changing the parameter to All and different Product Numbers, I copy and paste the new SQL Statement to M in Power BI and update it to point to my parameter in Power BI. Be aware, that the DECLARE Statement is not needed here.

let
    Source = Sql.Database
            (
                paramServer,
                paramDB
            ),
    Query = "
            SELECT p.[ProductID]
                ,p.[Name]
                ,p.[ProductNumber]
                ,p.[Color]
                ,p.[StandardCost]
                ,p.[ListPrice]
                ,p.[Size]
                ,p.[Weight]
                ,p.[ProductCategoryID]
                ,p.[ProductModelID]
                ,p.[SellStartDate]
                ,p.[SellEndDate]

            FROM [SalesLT].[Product] p

            WHERE p.ProductNumber IN (CASE WHEN '" & paramProductNumber & "' = 'All' THEN ISNULL(ProductNumber, '') ELSE '" & paramProductNumber & "' END )",
    NativeQuery = Value.NativeQuery
                    (
                        Source,
                        Query,
                        null,
                        [EnableFolding = true]
                    )
in
    NativeQuery
If I now change my paramProductNumber value the table reacts and if I put All into it, I see all values – perfect!

Before publishing, there is one thing left. We have to make the Parameter multi value aware so not only single values can be passed. To do that, we hit Close & Apply and switch to the model view. In there, I select the ProductNumber field and enable Multi-Select.

Now, switching back to the report view, I got another error.
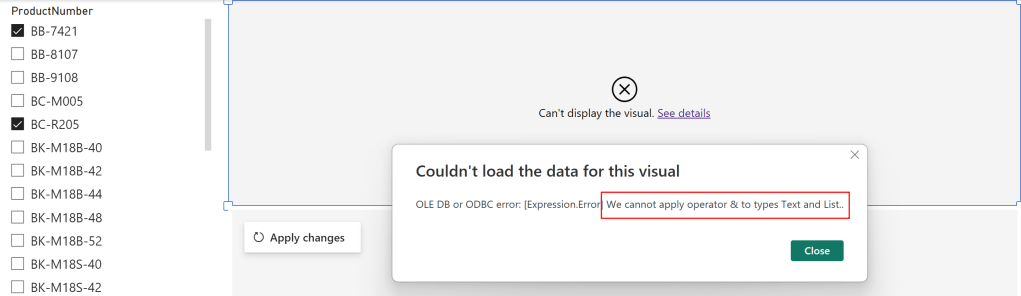
The reason for this error is again the M code as the Parameter is a Text and therefore Power Query expects a text value. But passing multi values converts the parameter to a List and it can not be matched, that’s what the error says at the end. To fix it, let’s go back to Power Query and open the Advanced Editor of the SalesLT Product table. In there, I add at the top a new step which checks if the parameter is of type list, and if so, convert it to text separated by single quotes. If not, it’s just passing the same value to the selectedProductNumber step. On top, I remove the single quotes in my WHERE clause as I’m providing them in the selectedProductNumber step already and change the reference now to my newly created step.

Now, I just click Close & Apply button, delete the table visual as it’s not needed anymore, and publish my report. Don’t get confused because of the error message the Paginated Report visual is still showing – we have to first update the Dataset in the Service to see the changes.
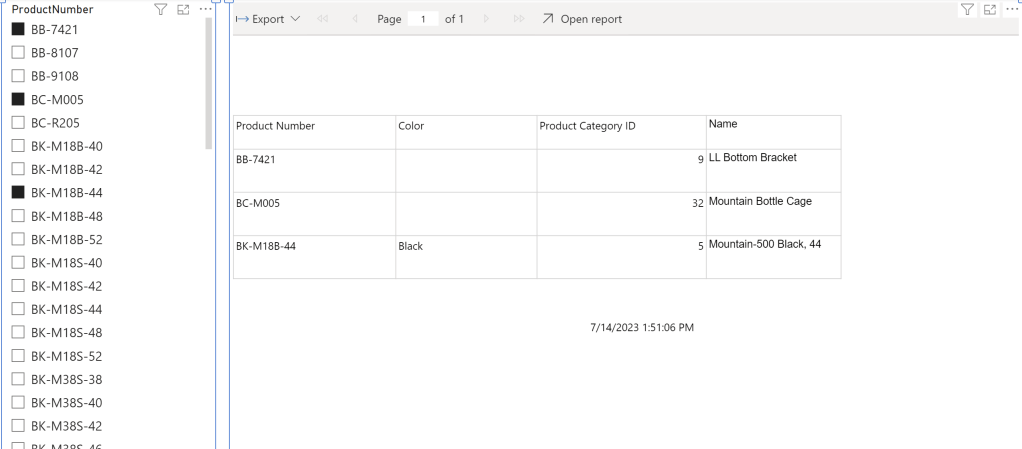
After successfully publishing the Power BI Report, I just hit apply changes in the Paginated Report Visual and see that my selection is now passing through! Even if I select multiple values, I can see the expected result.
Please let me know if this post was helpful and give me some feedback. Also feel free to contact me if you have any questions.
If you’re interested in the files used in this blog check out my GitHub repo https://github.com/PBI-Guy/blog