In my last post, I showed how you can connect to a REST API with Power BI by using a Service Principal. After that, I got quite a lot of comments and questions if it would be possible to also create a POST request with Power BI, not only a GET one. First, I thought it will not be possible as Power BI is a “read-only” tool, but I love challenges so I gave it a try. After a while, I found a way how to do so which I explain in this post!
Prerequisites
I’m going to use the PBIX file I created before to connect to the Power BI REST API. But instead of listening all workspaces, I’m going to execute a DAX statement and calling the Execute Queries in Group REST API (https://learn.microsoft.com/en-us/rest/api/power-bi/datasets/execute-queries-in-group). Therefore, following things are needed
- Power BI Desktop
- a Service Principal
- Sufficient permission to call the REST API
- a published Power BI Dataset to execute a DAX statement against it
Let’s start
I’m not going to walk you through how to use a Service Principal and authenticate against the Power BI REST API with it. You can find it in my previous blog post here (https://pbi-guy.com/2023/03/25/connect-with-power-bi-to-the-power-bi-rest-api-with-a-service-principal/). To easy things up, I’m going to use the PBIT file from the last post, which you can find in my GitHub here.
Once opened, I enter the required parameters as seen below and hit Load.

After the data loaded successfully, I enter Power Query Editor by hitting the Transform data button in the ribbon. Once here, I select New Source – Blank Query.
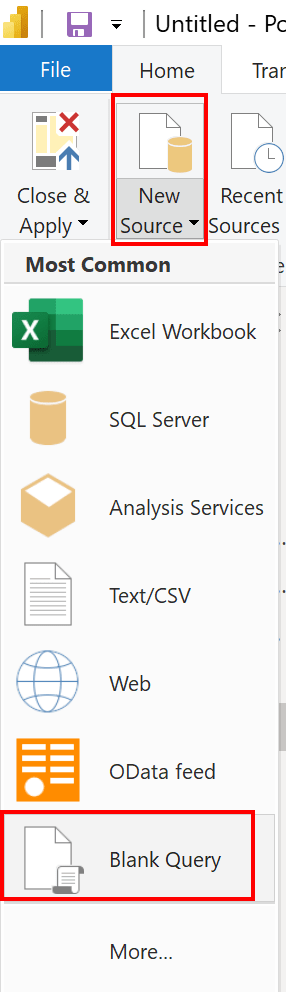
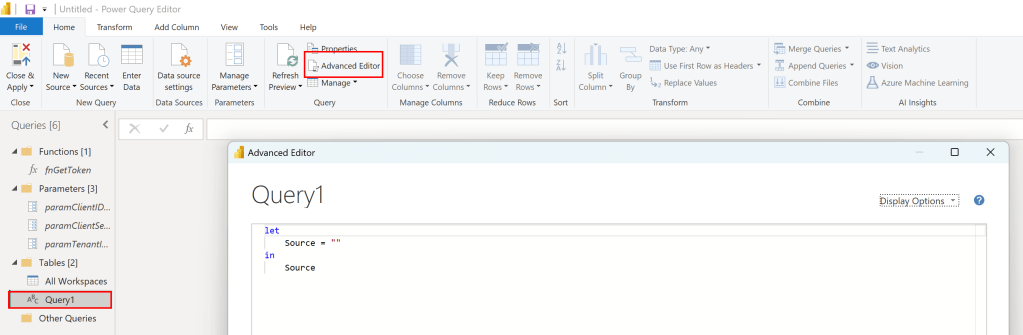
As we have to do some M-Language on our own, we can’t use the Web Connector to create a POST request. Therefore I start with a blank query. Once loaded, I select Query1 and hit Advanced Editor to open the M-Language Editor.
I’ll now create step by step my URL with the request body and will combine afterwards everything into one step. So let’s start with the URL. According to the documentation, the URL to execute a DAX statement looks as following:
POST https://api.powerbi.com/v1.0/myorg/groups/{groupId}/datasets/{datasetId}/executeQueriesThis means we need a Workspace (group) ID as well as a Dataset ID. Heading over to powerbi.com, I’m selecting a Dataset on which I wish to execute my DAX statement. Now, I can find the needed details in the URL.

Copy and pasting the ID into my Power BI M-Language, I got now following line.

Because I want to parametrize my URL as well as my DAX statement, I press Done, select Home Ribbon – Manage Parameters, and create three new text parameters called paramWorkspaceID, paramDatasetID, and paramDAX. The last one is for my DAX statement, which I also wish to parametrize. For my DAX parameter, I use a simple code to evaluate the Top 10 Cities from my Dataset. Important to note, I need the quotation at the beginning and at the end of my DAX statement.

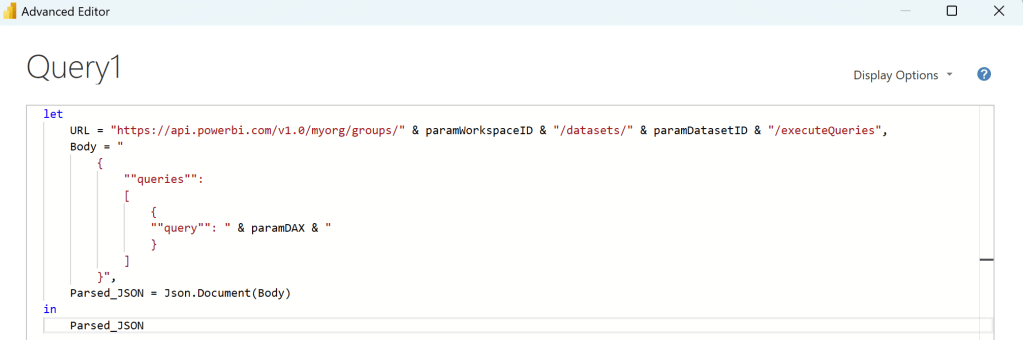
Now let’s go back to my Query1, hit Home Ribbon – Advanced Editor. After the window for M-Language pops-up, I replace the hardcoded Workspace and Dataset ID to replace it with my new parameters. To do so, I add a quotation in front and at the end of the ID, add a & at the same position, and replace the id with the corresponding parameter.

Next, let’s create the required body. I add a coma at the end of my URL step, call my next step Body, and copy & paste the body from the doc between two quotations. To make it a little bit more readable, I format the body as seen below. Important, I have to reference my new step at the end after “in”.

As the body includes quotations, we have to make sure they will be recognized. Therefore, I format the body and add another quotation to each already existing one. Further, I remove the serializerSettings and the impersonatedUserName as those attributes are not needed in my case. Lastly, I included my DAX parameter after the query attribute. Now, my M-Code looks like following and the Token warning message at the bottom is also gone.

As a next step, I have to make sure the body is recognized as JSON format. All I need to do is to add another step, naming it (Parsed_JSON in my case), and use the function Json.Document(Body). At the end I also need to reference to my last created step in the in clause. This step is not really required for the whole purpose, it’s just making sure the body is a valid JSON format.
Making sure everything works as expected, let’s hit Done and check all steps. If I select the URL step now, I should see just a URL including Workspace and Dataset ID we’re going to call. Looks good so far.

If I check the Body step, a JSON format-like body should be visible. If I compare it with the documentation, it should be more or less the same without any additional quotations or anything else, including my DAX statement coming from my parameter. Looks also good.

In my last step, Parsed_JSON, I should see a Record “List” which I can transform to a table. This indicates that the conversion to JSON has been successful and that we don’t have a typo in our Body step.

Now, we’re ready to call the URL. I create a new step called “Source” and use the Web.Content Connector (which is the Web Connector). In there, I provide first the URL I wish to call which is coming from my URL step. Next, I have to specify the Header information. To do so, I open square brackets and add Headers=[]. In the second square brackets, I have to add the Authorization and the Content-Type. The Authorization is coming from our previously created function (see my last blog post) and the Content-Type is “application/json”. After closing the second square brackets, I have to provide the body to execute our DAX statement. I’ll do this with “Content = Text.ToBinary(Body) referencing to my Body step. At the end, I have again to reference to my last step “Source” in M.

After hitting done, I should be able to get a result now.
If you see “Expression.Error: Access to the resource is forbidden.” try to refresh the table to execute the fnGetToken function to get a new token. If it still doesn’t work, make sure your service principal has sufficient permission to the Dataset.

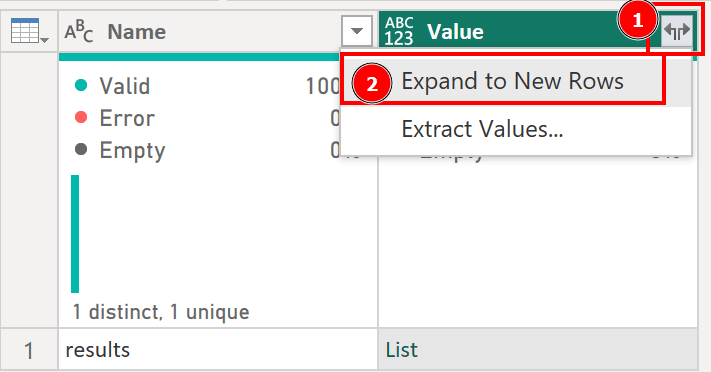
I now hit the “Into Table” button in the Convert Ribbon. Afterwards, I select the two arrows and hit Expand to New Rows.
As a next step, I almost do the same like before by selecting the two arrows, deselect “Use original column name as prefix” as I don’t need that, and hit ok.

Those steps have to be repeated three more times until you get following screen.

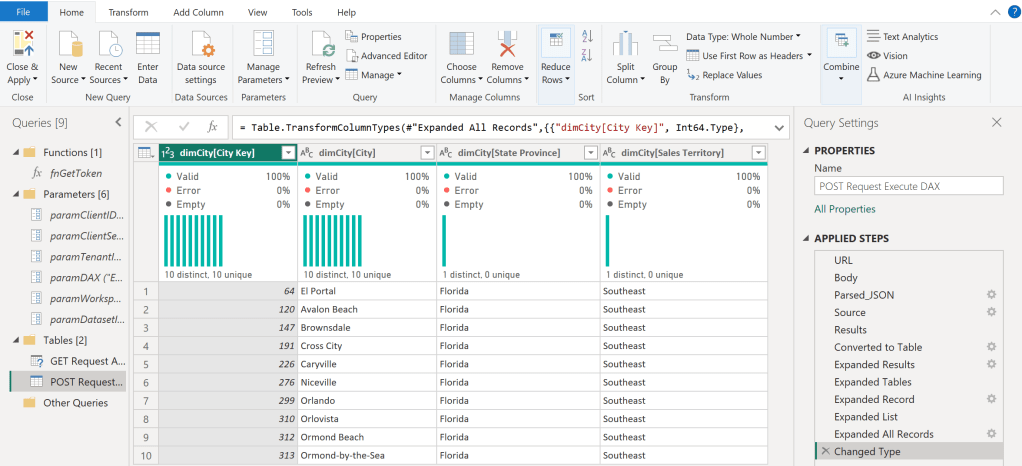
Now, we just have to expand it one more time to get our final result!

At the end, I wish to give a proper name to my Table (renaming from Query1 to POST Request Execute DAX), specify data types for each column and remove / transform as I wish. My final result looks like following.
And the M-Code behind can be seen below.
let
    URL = "https://api.powerbi.com/v1.0/myorg/groups/" & paramWorkspaceID & "/datasets/" & paramDatasetID & "/executeQueries",
    Body = "
        {
            ""queries"":
            [
                {
                ""query"": "& paramDAX &"
                }
            ]
        }",
    Parsed_JSON = Json.Document(Body),
    Source = Json.Document(
        Web.Contents(
            URL,
            [
                Headers= [
                    Authorization=fnGetToken(),
                    #"Content-Type"="application/json"
                    ],
                Content = Text.ToBinary(Body)
            ]
        )
    ),
    Results = Source[results],
    #"Converted to Table" = Table.FromList(Results, Splitter.SplitByNothing(), null, null, ExtraValues.Error),
    #"Expanded Results" = Table.ExpandRecordColumn(#"Converted to Table", "Column1", {"tables"}, {"tables"}),
    #"Expanded Tables" = Table.ExpandListColumn(#"Expanded Results", "tables"),
    #"Expanded Record" = Table.ExpandRecordColumn(#"Expanded Tables", "tables", {"rows"}, {"rows"}),
    #"Expanded List" = Table.ExpandListColumn(#"Expanded Record", "rows"),
    #"Expanded All Records" = Table.ExpandRecordColumn(#"Expanded List", "rows", {"dimCity[City Key]", "dimCity[City]", "dimCity[State Province]", "dimCity[Sales Territory]"}, {"dimCity[City Key]", "dimCity[City]", "dimCity[State Province]", "dimCity[Sales Territory]"}),
    #"Changed Type" = Table.TransformColumnTypes(#"Expanded All Records",{{"dimCity[City Key]", Int64.Type}, {"dimCity[City]", type text}, {"dimCity[State Province]", type text}, {"dimCity[Sales Territory]", type text}})
in
    #"Changed Type"
I also created a PBIT file which can be found in my GitHub repo.
This way we created a POST Request to a REST API and got a result back with Power BI – awesome! Nevertheless, I still wouldn’t recommend to go this way as the Client Secret as well the Client ID has to be exposed in a parameter which is definitely not secure. I haven’t crossed an alternative so far to securely store a password in Power BI except of building an own connector.
Please let me know if this post was helpful and give me some feedback. Also feel free to contact me if you have any questions.
If you’re interested in the files used in this blog check out my GitHub repo https://github.com/PBI-Guy/blog

Hey, good article! Do you know that there is a GitHub repository full of functions against Power BI REST API with M? Link to the repository: https://github.com/tirnovar/Power_BI_REST_API_PQ
LikeLike
Didn’t know that, thanks very much for sharing!
LikeLike
You save my day! thank you very much! this is so useful!
LikeLike
very welcome 🙂
LikeLike
this is my code but it doesn’t workt:let
URL=”https://api.track.toggl.com/reports/api/v3/workspace/……/filters/projects”,
Body = “{
“”active””: true,
“”start””: 0,
“”page_size””: 2000
}”,
Parsed_JSON = Json.Document(Body),
Source = Json.Document(
Web.Contents(URL, [Headers = [
#”Authorization” = “Basic OWU……..2Vu”,
#”Content-Type”=”application/json”
],
Content = Text.ToBinary(Body)
]
)
)
in
Source
LikeLike
Hi
It’s a little bit hard to evaluate what causes the issue without knowing what steps you exactly did and what the error message is…? Further, it’s best to post support questions on the Power BI community –> https://community.fabric.microsoft.com/t5/Community-Blog/ct-p/PBI_Comm_CommunityBlog Usually, they answer quite fast
LikeLike
Can you setup automatic refresh if you are using this? It does not seem like you can because power BI cannot authenticate the connection if the credentials are within the query and your API requires them.
I’ve made a dashboard, but I need it to be automatically refreshed periodically. I cannot do that if making anonymous requests with web.contents
LikeLike
Hi,
This is a limitation in Power BI service. Alternatively, you can try to adopt it and use Relative Path URL or build your own Power Query Connector.
LikeLike