In recent discussions with customers, I almost got every time the same question when we talk about administrating and governing the environment: How do we know who REALLY needs a Power BI Pro license? The root cause of this question is obviously the urge to save cost and not to spend money on unused licenses. On the other hand, if a Power BI admin has to check each user manually if the license is still needed, there is no really cost optimization as the manual work also require time and cost at the end. Therefore, we’re looking for an automated way to solve this need. Luckily, there are REST APIs to support us! Let me walk you through the different steps and how a solution could look like.
What kind of information do we need?
To be able to tell who needs a license there are different information needed:
- All users with a Power BI license
- Last activity date for each user (like last log in, viewed report, etc.)
- Decision how many days / months / years an user can be inactive and still keep a license
Once we got all users with a Power BI license, we can check with the last activity date and decide if the user still requires a license. In my case, I wish to remove the license if the user hasn’t had an activity in the last 90 days, but this can be adjusted based on your needs.
Prerequisites
As I love Python, I’m going to code in Notebooks and call REST APIs. The whole solution could also be done with PowerShell if you prefer this language more.
To get the needed details which user has what kind of license, we have to work with the Microsoft Graph API. Right now, there are two different versions: v1.0 and beta. As recommended by Microsoft documentation, I’m going to use the general available v1.0. Scrolling through the different options of the API, we’ll find the GET /users request which gives us all users in our Azure Active Directory (AAD).
Looking further, the API also offers to list all licenses an individual user has through the GET /users/{id}/licenseDetails where we have to provide the user ID. Combining those two APIs we’ll know which user have what kind of license.
As a next step, we’ll need the activity details as well. You can find a possible solution on my blog how to extract those details here.
Lastly, to be able to call the Graph API I would recommend setting up a Service Principal with the needed permissions. So, let me first walk you through this process.
How to set up a Service Principal for the Graph API
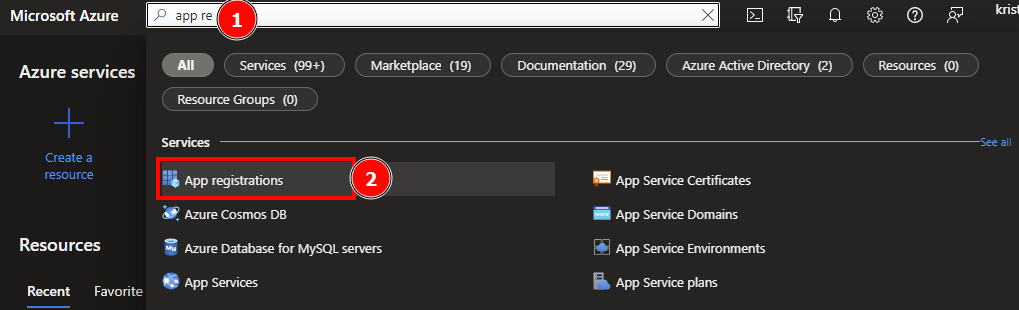
Head over to https://portal.azure.com and search for App registrations in the search bar at the top and select it.
Hit + New registration and give a recognizable name to your Service Principal (SP). In my case I’m going to name it “Power BI Guy Graph API”. As I wish to run the SP only in my directory, I choose the first account type in the list and let the redirect URI empty. Once done, I just hit the “Register” button.

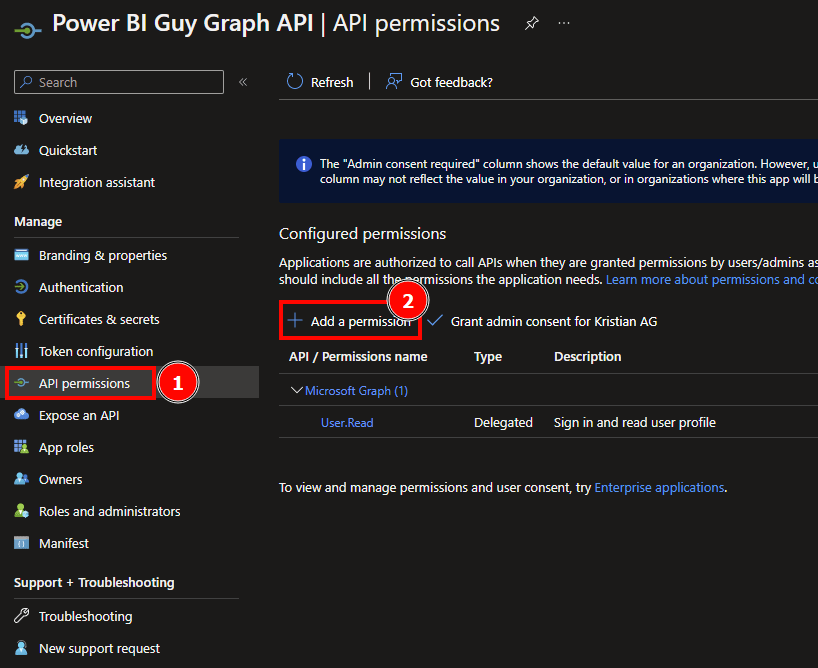
After the SP is registered, we have to give the necessary API permissions. To do so, click on “API permissions” on the left-hand side and select + Add a permission.
Because I want to use the same SP to read all users and check licenses for each user, I’ll give the combined permission of both endpoints. To check which permissions are needed, check the Graph API documentation under the section “Permissions”. As we’re using a SP, we’re interested in the “Application” type of permission. Here’s an example of the list users API.

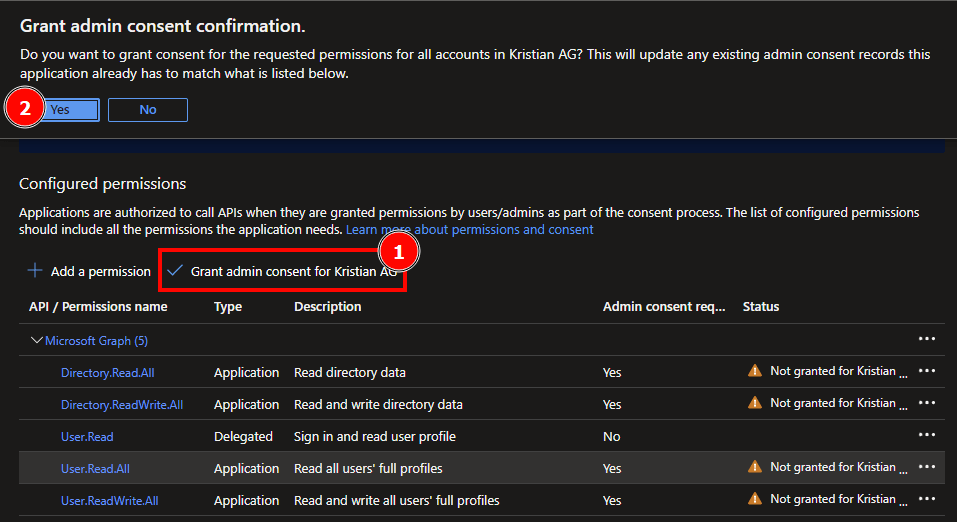
Heading back to the Service Principal, I choose “Microsoft Graph” at top after selecting the + Add a permission button. Because I want to run my app in the background, I choose the “Application permissions”. Once selected, I search for all listed permissions needed for the API. In this case, it’s User.Read.All, User.ReadWrite.All, Directory.Read.All, Directory.ReadWrite.All I just enter the needed permission in the search box and select it. Once all permissions are selected, I hit the Add permissions button.

After the permissions have been added, we have to grant admin consent to be able to call the API and read our necessary information.
When you grant tenant-wide admin consent to an application, you give the application access on behalf of the whole organization to the permissions requested. Granting admin consent on behalf of an organization is a sensitive operation, potentially allowing the application’s publisher access to significant portions of your organization’s data, or the permission to do highly privileged operations. Examples of such operations might be role management, full access to all mailboxes or all sites, and full user impersonation.
https://docs.microsoft.com/en-us/azure/active-directory/manage-apps/grant-admin-consent
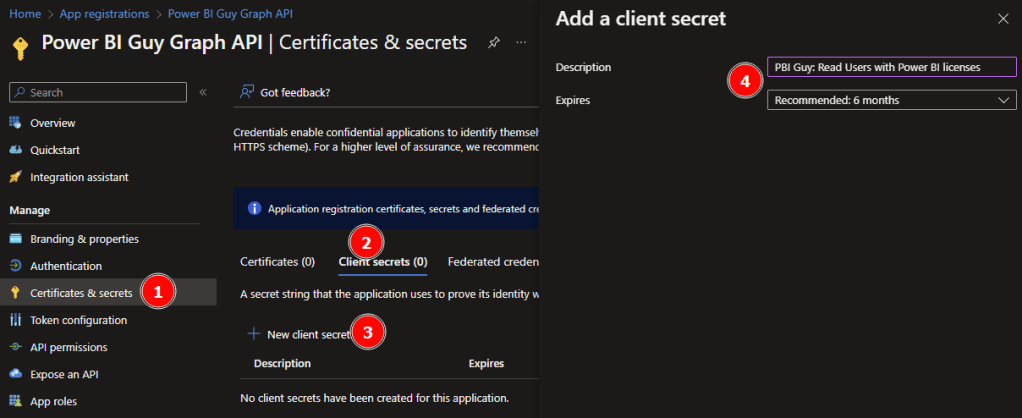
Lastly, we have to create a secret (that’s like a password for our SP) to be able to log in with the SP. To do so, select Certificates & secrets on the left, select Client secrets, and hit the + New client secret. Give a recognizable description and an expires timeline. In my case I’ll use “PBI Guy: Read Users with Power BI licenses” and 6 months expiration.
Keep in mind your password will in this case expire after 6 months! Meaning you’ll need to recreate a secret or set up another expiration time.
Copy the Value of your secret now! Once you refresh / leave the page, the secret value will not be fully visible anymore and you would need to create a new one.

Now that we have our SP registered, let’s start the fun part with Python.
Get the job done with Python
As usual, we first have to import our needed libraries. In this case, following libraries are needed.

#Import necessary libraries

import msal
import requests
import json
import pandas as pd
from pyspark.sql.functions import *
from datetime import date, timedelta
You’ll probably notice that I work in the Azure Synapse environment to create and run my Python code. Obviously, you can choose your own environment but the benefits of using Synapse will come along this article!
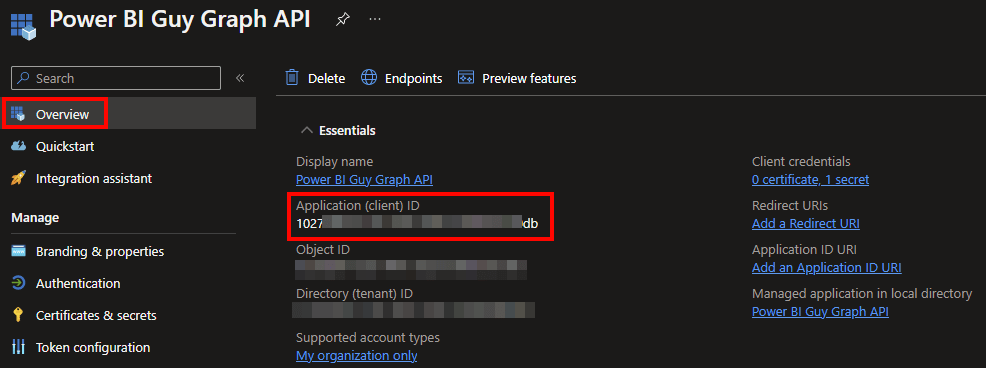
In my next block of code, I set the needed variables. I start with the Service Principal ID or also called Client ID. This can be found in Azure Portal by selecting the newly created App and in the Overview screen, you’ll find the Client ID at the top.
The previously copied Secret Value is my next parameter. To get an access token, we have to specify the scope and authority URL as well. Scope in this case is set up to the Graph URL and the authority URL includes your tenant’s name at the end. Lastly, I define a Pandas DataFrame including all licenses SKUs with ID and Name in which I’m interested in. Because we’ll get all licenses back from each user through the Graph API and I’m only interested in the Power BI licenses, I want to specify and filter afterwards on those. Keep in mind that Power BI Pro is part of different SKUs like the E5 or A5. A full list of all SKUs including name and UID can be found here: https://docs.microsoft.com/en-us/azure/active-directory/enterprise-users/licensing-service-plan-reference

#Set parameters

client_id = '' #ID of Service Principal / App
client_secret = '' #Secret from Service Principal / App
scope = 'https://graph.microsoft.com/.default' #Defining Scope for Graph API
authority_url = "https://login.microsoftonline.com/..." #Defining authority / host

#Define all needed Power BI related SKUs
#All SKUs with the ID and friendly name of Microsoft can be found here: https://docs.microsoft.com/en-us/azure/active-directory/enterprise-users/licensing-service-plan-reference Check if new SKUs are available or have changed over time. The list below has been created on 15th September 2022
all_skus = pd.DataFrame ({
    'skuId': ['e97c048c-37a4-45fb-ab50-922fbf07a370', '46c119d4-0379-4a9d-85e4-97c66d3f909e', '06ebc4ee-1bb5-47dd-8120-11324bc54e06', 'c42b9cae-ea4f-4ab7-9717-81576235ccac', 'cd2925a3-5076-4233-8931-638a8c94f773', 'e2be619b-b125-455f-8660-fb503e431a5d', 'a4585165-0533-458a-97e3-c400570268c4', 'ee656612-49fa-43e5-b67e-cb1fdf7699df', 'c7df2760-2c81-4ef7-b578-5b5392b571df', 'e2767865-c3c9-4f09-9f99-6eee6eef861a', 'a403ebcc-fae0-4ca2-8c8c-7a907fd6c235', '7b26f5ab-a763-4c00-a1ac-f6c4b5506945', 'c1d032e0-5619-4761-9b5c-75b6831e1711', 'de376a03-6e5b-42ec-855f-093fb50b8ca5', 'f168a3fb-7bcf-4a27-98c3-c235ea4b78b4', 'f8a1db68-be16-40ed-86d5-cb42ce701560', '420af87e-8177-4146-a780-3786adaffbca', '3a6a908c-09c5-406a-8170-8ebb63c42882', 'f0612879-44ea-47fb-baf0-3d76d9235576'],
    'skuName': ['Microsoft 365 A5 for Faculty', 'Microsoft 365 A5 for Students', 'Microsoft 365 E5', 'Microsoft 365 E5 Developer (without Windows and Audio Conferencing)', 'Microsoft 365 E5 without Audio Conferencing', 'Microsoft 365 GCC G5', 'Office 365 A5 for Faculty', 'Office 365 A5 for Students', 'Office 365 E5', 'Power BI', 'Power BI (free)', 'Power BI Premium P1', 'Power BI Premium Per User', 'Power BI Premium Per User Add-On', 'Power BI Premium Per User Dept', 'Power BI Pro', 'Power BI Pro CE', 'Power BI Pro Dept', 'Power BI Pro for GCC']
})
You can of course adjust the all_skus DataFrame based on your needs.
As a next step, I want to log in with the SP and get an access token to work with and call the Graph API. To do so, I call the msal.ConfidentialClientApplication and provide the needed details. Afterwards, I store the access token in a result variable.
app = msal.ConfidentialClientApplication(client_id, authority=authority_url, client_credential=client_secret)
result = app.acquire_token_for_client(scopes=scope)
Next, I specify the Graph API to get all AAD users in a variable called url_get_all_users. Going further, I check if I got an access token and if so, I want to call the Graph API to get the needed details. If in any case I don’t get an access token, it also doesn’t make sense to call the Graph API as we’ll get a 403 error. Once the call succeeded, I store the result in a df_all_users DataFrame including only the needed columns “displayName”, “mail”, “userPrincipalName”, and “id”.
url_get_all_users = 'https://graph.microsoft.com/v1.0/users' #URL to get all AAD users

#If access token is created and received, call the get all users url to receive licenses per user
if 'access_token' in result:
    access_token = result['access_token']
    header = {'Content-Type':'application/x-www-form-urlencoded', 'Authorization':f'Bearer {access_token}'}

    api_call = requests.get(url=url_get_all_users, headers=header) #Effective get all users from AAD URL call

    result = api_call.json()['value'] #Get only the necessary child
    df_all_users = pd.DataFrame(result) #Convert to DataFrame
    df_all_users = df_all_users[['displayName', 'mail', 'userPrincipalName', 'id']] #Get only needed columns
As I have now all AAD users, I want to check which license each user has. To do so, I have to loop through all users in the df_all_users DataFrame and call the Graph API to get the license details. To be able to collect and store those details from each user into once, comprehensive DataFrame, I create an empty one before the loop.
In the loops itself I extract the current User ID, User Principal, and specify the Graph API URL for the current user in a separate variable. Afterwards, I call the API and store the result in a df_user_licenses DataFrame. To make sure I know which user is called, I expand the DataFrame with the User ID and User Principal info.
    df_all_user_licenses = pd.DataFrame() #Create empty DataFrame to store all users and assigned licenses

    for idx, row in df_all_users.iterrows(): #Iterate through each users from AAD
        user_id = row['id'] #Store the User ID in a separate variable
        userPrincipal = row['userPrincipalName']
        url_get_licenses = 'https://graph.microsoft.com/v1.0/users/' + user_id + '/licenseDetails' #Defining the URL to get licens per user

        api_call = requests.get(url=url_get_licenses, headers=header) #Effective get license per User URL call
        result = api_call.json()['value'] #Get only the necessary child

        df_user_licenses = pd.DataFrame(result) #convert to DataFrame
        df_user_licenses['userId'] = user_id #Add User ID to identify user
        df_user_licenses['userPrincipal'] = userPrincipal #Add User Principal to identify user
In the last piece of this block of code I want to filter down all licenses by user to only Power BI related ones. Because I get through ALL objects in AAD it could be that some of them don’t have a license assigned at all (like a room resource) and to avoid errors, I use the try and except trying to filter the result. Of course, you can do an if else statement as well to check if you have an empty result or even go other paths. In my case, I decided to go with the try and except. Once done, I add the filtered result into my comprehensive df_all_users_licenses DataFrame.
        #I'll use a try and except statement to handle empty requests --> if no license is assign nothing will be return and without try and except the script will run into an error.
        #An if else statement would also work to check if the result is empty or not
        try:
            df_user_licenses = df_user_licenses[df_user_licenses['skuId'].isin(all_skus['skuId'])] #Get only PBI related SKUs
            df_user_licenses = df_user_licenses[['skuId', 'userId', 'userPrincipal']] #Get only needed columns
            df_user_licenses = all_skus.merge(df_user_licenses) #Using a join to retrieve only users with assigned PBI licenses
            df_all_user_licenses = pd.concat([df_all_user_licenses, df_user_licenses]) #Adding result to all user licenses DataFrame

        except:
            pass
My whole code looks now as following

Let me display the df_all_user_licenses DataFrame to check what we got until now.

As we see we got different users and the assigned licenses. In my screen shot we can see the Office 365 E5 and the Power BI (free) license assigned to some users.
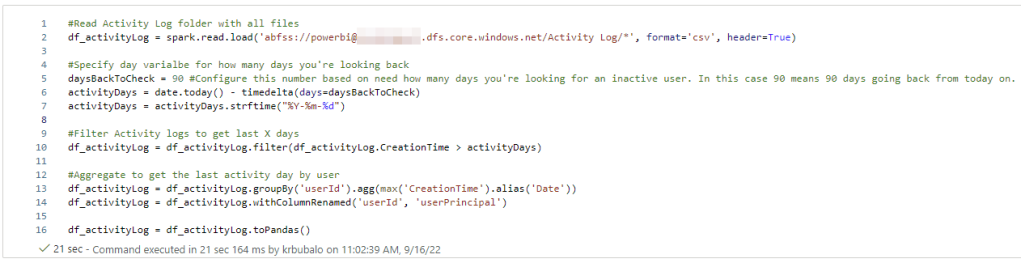
So far, we have logged in via a Service Principal, got all users from AAD and the assigned licenses for each user. As a next step, we have to check the last activity date for each user. Here comes the superpower of Azure Synapse! As mentioned already, in one of my last blog posts I showed how I use Python to store Activity Logs in Azure Data Lake Gen2 – see https://pbi-guy.com/2022/03/10/power-bi-and-activity-logs-with-python/ I’m going to reuse this work and just read all the CSV files already stored with pySpark and store it into the df_activityLog DataFrame. Pay attention to “*” at the end of my path to read all CSV files, not only one.
#Read Activity Log folder with all files
df_activityLog = spark.read.load('abfss://powerbi@....dfs.core.windows.net/Activity Log/*', format='csv', header=True)
If you’re not sure how your abfss path should look like, head over to Data, Linked, select your container and folder where you’re log files are stored, right click on one file, and select New notebook – Load to DataFrame. Azure Synapse will create automatically a code to read your file with pySpark. Resue the path in your code.

My next step is to specify how many days back I want to check if some activity has happened in Power BI. In my case I go for the last 90 days and filter the df_activityLog DataFrame.
#Specify day varialbe for how many days you're looking back
daysBackToCheck = 90 #Configure this number based on need how many days you're looking for an inactive user. In this case 90 means 90 days going back from today on.
activityDays = date.today() - timedelta(days=daysBackToCheck)
activityDays = activityDays.strftime("%Y-%m-%d")

#Filter Activity logs to get last X days
df_activityLog = df_activityLog.filter(df_activityLog.CreationTime > activityDays)
As I’m not interested of what kind of activities have happened, I’ll just group my df_activityLog by UserID and get the max date out of it to see the last activity Date. Obviously, you could specify filters to check for specific activities like “View Report” or similar. But I decided to count every activity the same meaning as long as there is some kind of activity, the license is needed. To not mix things up, I rename the userId from the activity log to userPrincipal – which is more reliable and correct from my point of view. Last piece of the code is to convert the pySpark DataFrame to a Pandas DataFrame to be able to merge it afterwards easily.
#Aggregate to get the last activity day by user
df_activityLog = df_activityLog.groupBy('userId').agg(max('CreationTime').alias('Date'))
df_activityLog = df_activityLog.withColumnRenamed('userId', 'userPrincipal')

df_activityLog = df_activityLog.toPandas()
My whole code looks now as following.
Let’s display the result of df_activityLog as well.

As I’m using a demo environment, I don’t have much user activities on it. In the last 90 days, only 4 users have done something in my Power BI environment.
Now that I have all users with Power BI related licenses, and I have all users with some kind of activity, let’s merge those two DataFrames and check which users has a license but no activity in the last 90 days. To do so, I use the pd.merge and filter afterwards only users without a date as this means no activity has happend.

#Combine both DataFrames to check all users and their last login
df_combined = pd.merge(df_all_user_licenses, df_activityLog, how='left', on=['userPrincipal', 'userPrincipal'])

#Get all Users without login in last X days
df_combined_only_NaN = df_combined[pd.isna(df_combined['Date'])]
Let’s again display the df_combined_only_NaN DataFrame to check if we have some users with a Power BI related license but no activity.

As I’m doing this for demo purpose only, I will focus on removing Power BI Free licenses. Of course, there is no cost behind this license and in a real-world scenario I would focus especially on Power BI Pro (and probably Power BI Premium Per User), but the approach is absolutely the same, regardless which license you wish to remove. Therefore, I add an extra code block to filter down to only Power BI free licenses.

#Filter only to Power BI Free licenses for my demo use case
df_pbi_free = df_combined_only_NaN.loc[df_combined_only_NaN['skuId'] == 'a403ebcc-fae0-4ca2-8c8c-7a907fd6c235']

display(df_pbi_free)
If I now display all users with a PBI Free license, I see two users without an activity in the last 90 days in my case.

My last step is now to remove for those two users automatically the Power BI Free license. And again, the Graph API provides us with the right request. In this case, we need the POST /user/{id}/assignLicense request – see https://docs.microsoft.com/en-us/graph/api/user-assignlicense?view=graph-rest-1.0&tabs=http The documentation also highlights that a JSON body needs to be included looking like this.
{
  "addLicenses": [
    {
      "disabledPlans": [ "11b0131d-43c8-4bbb-b2c8-e80f9a50834a" ],
      "skuId": "45715bb8-13f9-4bf6-927f-ef96c102d394"
    }
  ],
  "removeLicenses": [ "bea13e0c-3828-4daa-a392-28af7ff61a0f" ]
}
One important detail is the content-type of the header. It has to be application/json so I start my code by adjusting the header variable. If wished, you can create another access token but in my case I’m going to reuse the already existing one.
#Overwrite header and reuse access token
header = {'Content-Type':'application/json', 'Authorization':f'Bearer {access_token}'}
Because the assignLicense request is per user, we have to create again a loop for each user for our df_pbi_free DataFrame. I extract again the user id, sku id, and the user principal in a separate variable to reuse it afterwards.
for idx, row in df_pbi_free.iterrows(): #Iterate through each users with a PBI Free license
    user_id = row['userId'] #Store the User ID in a separate variable
    sku_id = row['skuId'] #Store the SKU ID in a separate variable
    userPrincipal = row['userPrincipal']
My next step is to create the request URL and body. Once done, I can call the URL and remove the Power BI Free license for users.
    #configure URL to call to remove license from user
    url = 'https://graph.microsoft.com/v1.0/users/' + user_id + '/assignLicense'

    #create body with SKU ID
    body = {
        "addLicenses": [],
        "removeLicenses": [
            sku_id
        ]
    }

    #Call API to remove license
    api_call = requests.post(url=url, headers=header, json=body)
Making sure my call was successful, I print a message at the end depending on the returned status from the API (200 means successful, everything else is an error in my case).
    if api_call.status_code == 200:
        print('License has been successfully removed from user', userPrincipal)

    else:
        print('An error occured and license has NOT been removed')
My whole code looks now as following.

Before I run the code, let’s check manually if Adele and Alex really have a Power BI Free license in the Azure Portal. To do so, I go to the Azure Portal, search for users, and select each user. Once selected, I click on Licenses and check if Power BI Free is assigned. In both cases the answer is yes.

Now let’s run the code and see what will happen. After the code run successfully, I got following message.

It looks like it was successful. Let’s check manually by going back to the Azure Portal and refresh the view of Adele.

How great is this! We just removed the license automatically! This means we can really automate for which user licenses should be removed. In my demo case, I used the Power BI Free license to remove. But obviously this approach could also be used to remove other licenses like Power BI Pro, E5, and many others (depending on your needs and activity logs).
Please let me know if this post was helpful and give me some feedback. Also feel free to contact me if you have any questions.
If you’re interested in the files used in this blog check out my GitHub repo https://github.com/PBI-Guy/blog
