In recent discussions with my customers about Microsoft Fabric, the questions pops up how to create an internal and fair charge-back mechanism. There are different possibilities, from user-based, item-based, or usage-based scenarios, which you can leverage. From my point of view, the usage-based model would be the fairest one. In such a scenario, creators of items are eager to optimize their workload to reduce the usage on a capacity and therefore save some cost. But how can you create such a charge-back report? Let me walk you through in a this blog post how to set the basics and in my next one how a possible solution can look like.
Prerequisites
To be able to collect the necessary data and create a charge-back report, we will need some tools and items.
- Microsoft Fabric Capacity (Premium, PPU, or Embedded works as well)
- Microsoft Fabric Capacity Metrics App
- DAX Studio
- SQL Server Profiler
Let’s get started
The Fabric Capacity Metrics App is the best way to get an overview of who created how much load with which items on your capacity. The Microsoft documentation shows how easy it is to install and use it. Once installed, I switch to the Workspace called Microsoft Fabric Capacity Metrics and change the workspace settings to assign a capacity to the workspace. In my case, I use a Fabric one but a Premium, Premium per User, or Embedded would work as well.

Once done, I refresh the Semantic Model and open the report afterwards. Now, I have already an overview of the usage of the last 14 days. I would be able to filter now for example on a specific day to see what kind of items have produced how much load. But as I wish to have in detail who created the load, I need to drill-down to a specific data point. For that, I select on the top right visual a data point and hit the Explore button.

On the next page, I have a good overview of all interactive and background operations that have happened on my capacity (the two table visuals in the middle). If you’re interested in what kind of operations are considered as interactive resp. background, feel free to check the Microsoft documentation.

The issue right now is that on one hand we have only the last 14 days data and usually a monthly charge-back report is needed. An on the other hand, the details are only per Timepoint, which is a 30 second interval, available. Therefore, I need to extract the data to have a longer history and do that for each timepoint of the day. Let me start with extracting the data first.
Capture the DAX statement
I could connect with DAX Studio to the Semantic Model as the workspace is sitting now in a capacity and try to write my own DAX statement to get the required details. But as I’m efficient (not lazy as Patrick LeBlanc from Guy in a Cube says ;)), I’ll capture rather the DAX statement and adjust it if needed. To do so, I’ll use the SQL Profiler and connect to the Semantic Model. To get the connection string, I switch back to the Workspace settings, select Premium, and scroll down until I see the connection string. By hitting the button to the right, I copy it.

Now, I open SQL Server Profiler and put the connection string as Server name, select Azure Active Directory – Universal with MFA as authentication method, put in my mail as User name and hit Options.
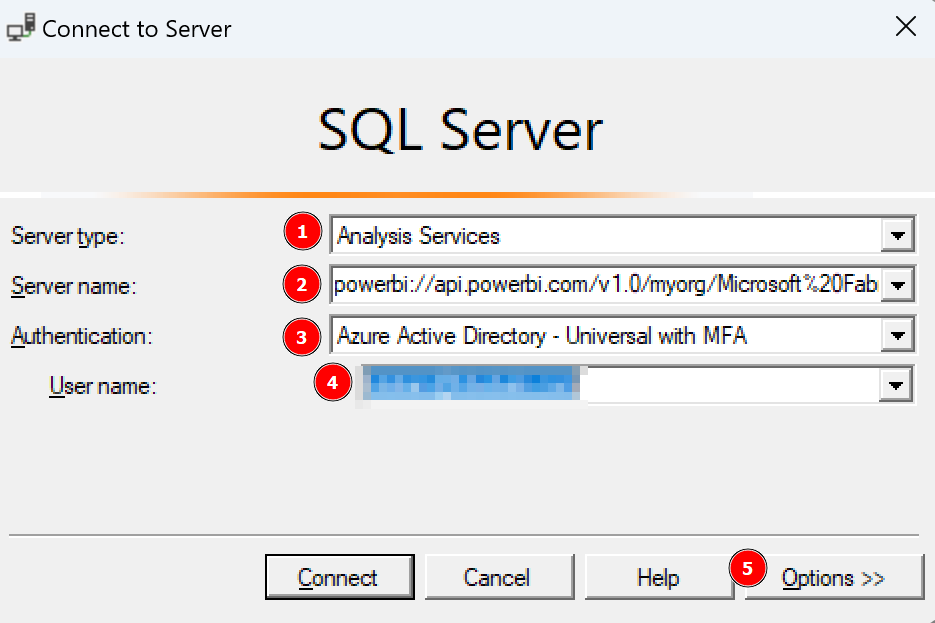
Once the window extends, I select Connection Properties, specify Fabric Capacity Metrics as database to which I wish to connect, and hit Connect.

On the next screen, I go directly to Events Selection at the top, extend Queries Events, and select Query Begin and Query End.

With that, I’m prepared to capture the DAX query but I don’t hit Run yet. I wish to make sure to get the right query so I switch back to the Power BI Report and enter the edit mode. Now, I just delete all the visuals except the Interactive Operations table. This way, I make sure no other query is executed and I capture only what I need.

Once prepare, I switch back to SQL Profiler and hit Run.

After our tracer is running, I switch one more time back to the Power BI Report and hit the refresh button at the top right.

Now I see two operations in my Tracer – Query Begin and Query End. If I select one of it, I have now the DAX Query for the interactive Operations.

DEFINE
	MPARAMETER 'CapacityID' =
		"9C3E7404-D2DA-4CB6-B93F-9873BDD3D95A"

	MPARAMETER 'TimePoint' =
		(DATE(2024, 3, 20) + TIME(15, 59, 0))

	VAR __DS0FilterTable =
		TREATAS({"9C3E7404-D2DA-4CB6-B93F-9873BDD3D95A"}, 'Capacities'[capacityId])

	VAR __DS0FilterTable2 =
		TREATAS({"Dataset"}, 'Items'[ItemKind])

	VAR __DS0FilterTable3 =
		TREATAS(
			{(DATE(2024, 3, 20) + TIME(15, 59, 0))},
			'TimePoints'[TimePoint]
		)

	VAR __DS0Core =
		SUMMARIZECOLUMNS(
			ROLLUPADDISSUBTOTAL(
				ROLLUPGROUP(
					'TimePointInteractiveDetail'[OperationStartTime],
					'TimePointInteractiveDetail'[OperationEndTime],
					'TimePointInteractiveDetail'[Status],
					'TimePointInteractiveDetail'[Operation],
					'TimePointInteractiveDetail'[User],
					'TimePointInteractiveDetail'[OperationId],
					'TimePointInteractiveDetail'[Billing type],
					'TimePointInteractiveDetail'[Start],
					'TimePointInteractiveDetail'[End],
					'Items'[IsVirtualArtifactName],
					'Items'[IsVirtualWorkspaceName],
					'Items'[WorkspaceName],
					'Items'[ItemKind],
					'Items'[ItemName]
				), "IsGrandTotalRowTotal"
			),
			__DS0FilterTable,
			__DS0FilterTable2,
			__DS0FilterTable3,
			"SumTimepoint_CU__s_", CALCULATE(SUM('TimePointInteractiveDetail'[Timepoint CU (s)])),
			"SumThrottling__s_", CALCULATE(SUM('TimePointInteractiveDetail'[Throttling (s)])),
			"SumDuration__s_", CALCULATE(SUM('TimePointInteractiveDetail'[Duration (s)])),
			"SumTotal_CU__s_", CALCULATE(SUM('TimePointInteractiveDetail'[Total CU (s)])),
			"Sumv__of_Base_Capacity", CALCULATE(SUM('TimePointInteractiveDetail'[% of Base Capacity]))
		)

	VAR __DS0PrimaryWindowed =
		TOPN(
			502,
			__DS0Core,
			[IsGrandTotalRowTotal],
			0,
			[SumTimepoint_CU__s_],
			0,
			'TimePointInteractiveDetail'[Billing type],
			0,
			'TimePointInteractiveDetail'[OperationStartTime],
			1,
			'TimePointInteractiveDetail'[OperationEndTime],
			1,
			'TimePointInteractiveDetail'[Status],
			1,
			'TimePointInteractiveDetail'[Operation],
			1,
			'TimePointInteractiveDetail'[User],
			1,
			'TimePointInteractiveDetail'[OperationId],
			1,
			'TimePointInteractiveDetail'[Start],
			1,
			'TimePointInteractiveDetail'[End],
			1,
			'Items'[IsVirtualArtifactName],
			1,
			'Items'[IsVirtualWorkspaceName],
			1,
			'Items'[WorkspaceName],
			1,
			'Items'[ItemKind],
			1,
			'Items'[ItemName],
			1
		)

EVALUATE
	__DS0PrimaryWindowed

ORDER BY
	[IsGrandTotalRowTotal] DESC,
	[SumTimepoint_CU__s_] DESC,
	'TimePointInteractiveDetail'[Billing type] DESC,
	'TimePointInteractiveDetail'[OperationStartTime],
	'TimePointInteractiveDetail'[OperationEndTime],
	'TimePointInteractiveDetail'[Status],
	'TimePointInteractiveDetail'[Operation],
	'TimePointInteractiveDetail'[User],
	'TimePointInteractiveDetail'[OperationId],
	'TimePointInteractiveDetail'[Start],
	'TimePointInteractiveDetail'[End],
	'Items'[IsVirtualArtifactName],
	'Items'[IsVirtualWorkspaceName],
	'Items'[WorkspaceName],
	'Items'[ItemKind],
	'Items'[ItemName]
I could use this query already and execute it in DAX Studio – just to make sure it works as expected.
Make sure to remove the [WaitTime: 0 ms] at the end of the query if you’re copying it from SQL Profiler.

Looks good! I repeat the same steps for the background operations and test is as well in DAX Studio. Once done, I close SQL Server Profiler as tracing is not necessary anymore.
As a next step, let me analyze the generated query and optimize it. I will start this time with the background operations. The first variable defined is a MPARAMETER for the Capacity ID. The second one is as well a MPARAMETER for the Timepoint including the conversion. MPARAMETERS are so-called binding parameters which are passed through from the Power BI report to Power Query. DAX.guide has a great explanation and example here: https://dax.guide/st/mparameter/ This means we have to pass those two values to retrieve the correct result.
Going further, three different variables are defined which are used later on to filter. We have again the Capacity ID, Timepoint, and an Item filter to get only Datasets. As I don’t need the Item filter, I just delete it. For readability reasons, I also renamed the other two variables going from __DS0FilterTable to varFilter_Capacity and from DS0FilterTable3 to varFilter_TimePoint.

My first block of DAX looks like this.
DEFINE
	MPARAMETER 'CapacityID' =
		"9C3E7404-D2DA-4CB6-B93F-9873BDD3D95A" --add your capacity ID here

	MPARAMETER 'TimePoint' =
		(DATE(2024, 3, 20) + TIME(15, 59, 0))

	VAR varFilter_Capacity =
		TREATAS({"9C3E7404-D2DA-4CB6-B93F-9873BDD3D95A"}, 'Capacities'[capacityId]) --add your capacity ID here

	VAR varFilter_TimePoint =
		TREATAS(
			{(DATE(2024, 3, 20) + TIME(15, 59, 0))},
			'TimePoints'[TimePoint]
		)
Replace the three dots with your Capacity ID.
The next big block is a simple group by logic based on different columns and summarizes different KPIs on top. I simplify and store it as well into a variable.
VAR varTable_Details =
		SUMMARIZECOLUMNS(
			'TimePointBackgroundDetail'[OperationStartTime],
			'TimePointBackgroundDetail'[OperationEndTime],
			'TimePointBackgroundDetail'[Status],
			'TimePointBackgroundDetail'[Operation],
			'TimePointBackgroundDetail'[User],
			'TimePointBackgroundDetail'[OperationId],
			'TimePointBackgroundDetail'[Billing type],
			'Items'[WorkspaceName],
			'Items'[ItemKind],
			'Items'[ItemName],

			varFilter_Capacity,
			varFilter_TimePoint,

			"Timepoint CU (s)", SUM('TimePointBackgroundDetail'[Timepoint CU (s)]),
			"Duration (s)", SUM('TimePointBackgroundDetail'[Duration (s)]),
			"Total CU (s)", CALCULATE(SUM('TimePointBackgroundDetail'[Total CU (s)])),
			"Throttling", CALCULATE(SUM('TimePointBackgroundDetail'[Throttling (s)])),
			"% of Base Capacity", CALCULATE(SUM('TimePointBackgroundDetail'[% of Base Capacity]))
		)
Lastly, we need an EVALUATE to get a result.
EVALUATE  SELECTCOLUMNS(
    varTable_Details,
    "BillingType", [Billing type],
    "Status", [Status],
    "OperationStartTime", [OperationStartTime],
    "OperationEndTime", [OperationEndTime],
    "User", [User],
    "Operation", [Operation],
    "OperationID", [OperationId],
    "WorkspaceName", [WorkspaceName],
    "Item", [ItemKind],
    "ItemName", [ItemName],
    "TimepointCUs", [Timepoint CU (s)],
    "DurationInS", [Duration (s)],
    "TotalCUInS", [Total CU (s)],
    "Throttling", [Throttling],
    "PercentageOfBaseCapacity", [% of Base Capacity]
)
This way, we have now an optimized and more readable DAX statement for the Background operations. To get the same optimized query for interactive operations, I only need to replace the TimePointBackgroundDetail table with TimePointInteractiveDetail and I’m already good to go! The whole DAX statement can be found in my GitHub repo.
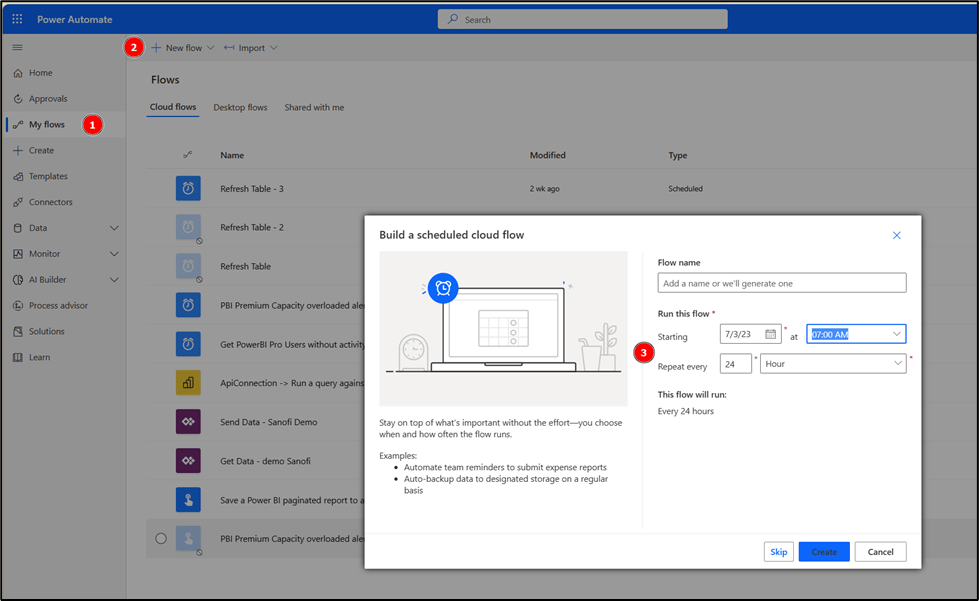
Now, we have everything on hand to extract the required details on a – for example – daily base. There are various options to achieve it – from Power Automate Flows, to Microsoft Fabric Pipelines, and / or Python Notebooks (Databricks or Microsoft Fabric), and many more. In my next blog post, I’ll walk you through one possible option to store the data into OneLake.
Please let me know if this post was helpful and give me some feedback. Also feel free to contact me if you have any questions.
If you’re interested in the files used in this blog check out my GitHub repo https://github.com/PBI-Guy/blog