Export Power BI Reports as PDF via REST API

It’s been a while since my last post as a lot is going on and I had the pleasure to realize some really interesting projects in the past. One of them was to use the Power BI REST API to download Power BI Paginated Reports as PDF locally to a PC. And this is exactly what I will walk you through in this blog post.

Prerequisites

To be able to export reports programmatically, there are some things needed:

  • Power BI report (it works the same for Power BI or Paginated Reports)
  • Power BI Capacity (either Premium, Embedded, or Fabric)
  • Service Principal with sufficient permission
  • Python skills
  • Tool to write / execute Python code (in my case Visual Studio Code)

Setting the scene

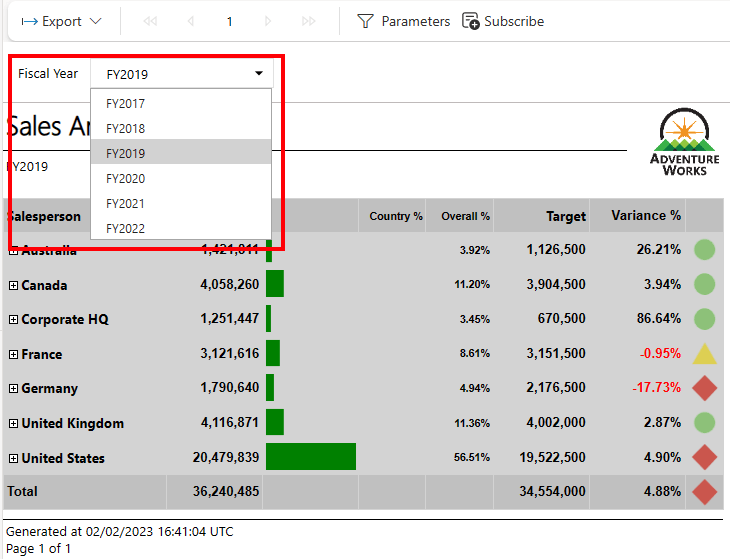
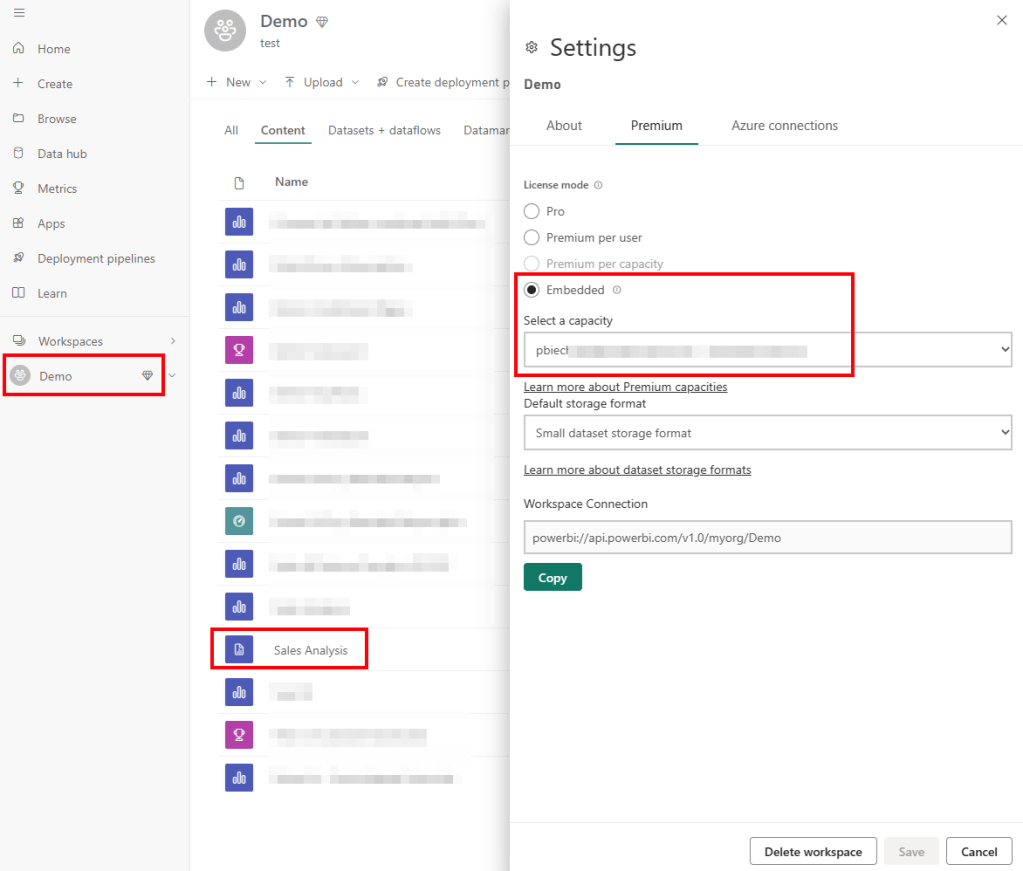
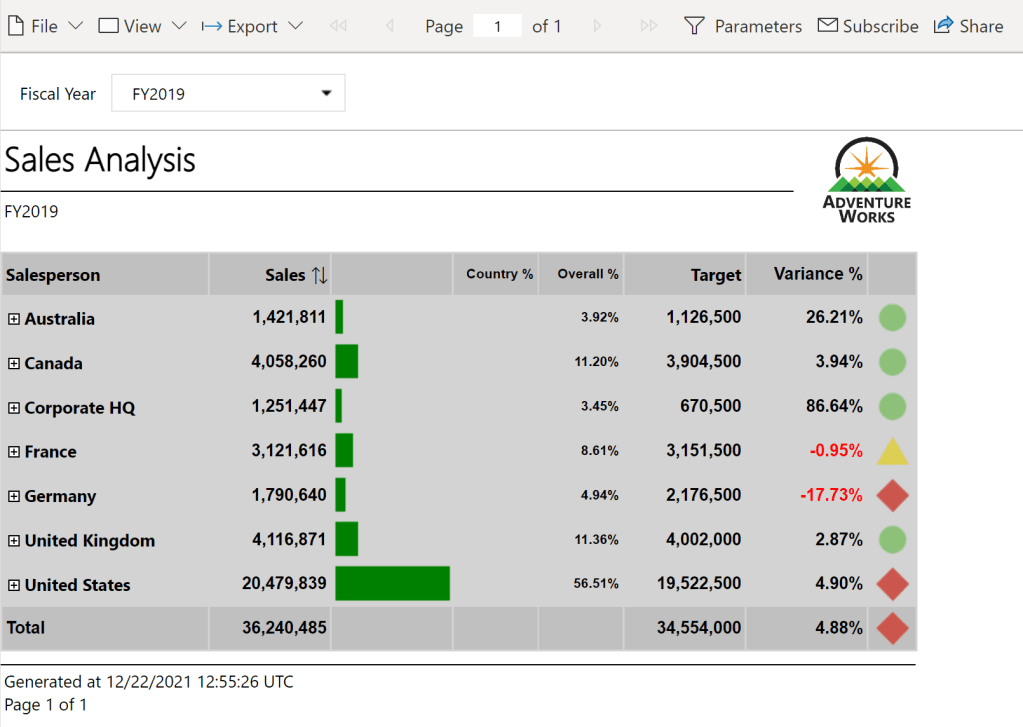
I have a Power BI Workspace assigned to a Power BI Embedded capacity, which has to run during the whole time otherwise I won’t be able to call the Power BI REST API. Further, I have obviously a Power BI Paginated Report to be able to export it to a PDF. In my case, I use the Sales Analysis report which is used as example for the Paginated Report in a Day course. I like this one as it’s simple and uses one Parameter Fiscal Year, which we can also influence during our REST API call.

Let’s code

As usual, the first step working with Python is to import the required libraries. In this case, I’m going to use following ones.

#Import needed libraries
import requests
import json
import pandas as pd
import msal
import os

In my next cell, I specify the required parameters for my Service Principal (if you need to know how to create one, check out this guide here: https://pbi-guy.com/2022/03/10/power-bi-and-activity-logs-with-python/) to be able to authenticate as well as the Workspace, Report ID, and some others. My last parameter will be my local path in which I wish to save the PDF(s).

#Specify Parameters

#Service Principal
client_id = ''
client_secret = ''

#Tenant Specification
tenant_id = ''
authority_url = 'https://login.microsoftonline.com/' + tenant_id
scope = ['https://analysis.windows.net/powerbi/api/.default']

#Report Specification
workspace_id = ''
report_id = ''
dataset_id = ''
base_url = 'https://api.powerbi.com/v1.0/myorg/groups/' + workspace_id + '/reports/' + report_id
format = 'PDF'
body = {

    "format": format
}

#Report File Specification
path = ''

As you probably noticed, there is a Parameter called “format” in which I specify the wished file format (PDF in this case). If you wish to export the reports in another format, you just need to overwrite this specific parameter for example to XLSX or DOCX, depending on your needs.

Now, that we specified all required parameters, we can first authenticate against Power BI Service with our Service Principal. For that, I use following code.

#Use MSAL to grab token
app = msal.ConfidentialClientApplication(client_id, authority=authority_url, client_credential=client_secret)
result = app.acquire_token_for_client(scopes=scope)

if 'access_token' in result:
    access_token = result['access_token']
    header = {'Content-Type':'application/json', 'Authorization':f'Bearer {access_token}'}

Next, we would be able to call the Power BI REST API call to export reports as PDF. Checking the documentation, it highlights that the API is asynchronous. When the API is called, it triggers an export job. After triggering an export job, use GetExportToFileStatus API to track the job status. Read more about the entire flow: Export Power BI reports and Export Paginated reports

This means we need to first call the Export API to trigger an export job. Afterwards, we need to check the status of the export by calling the /exports/{id} API and if succeeded, then we can get and save the file finally.

As I have to make a post resp. get request multiple times, I create in my next cell a function to easy up my life to not write the almost same code over and over again.

#Define Request Functions

#Post Reuqest
def post_request(url, header, body):
    api_call = requests.post(url=url, headers=header, json=body)
    return api_call

#Get Request
def get_request(url, header):
    api_call = requests.get(url=url, headers=header)
    return api_call

Because in my case I have a Paginated Report with Parameters, I’d like to dynamically get all values (Fiscal Year) and create for each year one PDF. If a new year will be added in future, the script should automatically detect that and create a PDF on top of it. For that purpose, I call the Execute Queries REST API to execute a DAX statement to get all Fiscal Year values out of my underlying dataset. Because I created a function in my previous cell, I can just call the post_request function and pass the required parameters to it. Lastly, I have to extract, format, and convert the Fiscal Year values into a Pandas Dataframe. To be sure I got all the values, I print them.

#Execute DAX Statement to get full list for Report Parameter
url_execute_query = "https://api.powerbi.com/v1.0/myorg/groups/" + workspace_id + "/datasets/" + dataset_id + "/executeQueries"
dax = "EVALUATE VALUES('Date'[Fiscal Year])"
query = '{"queries": [{"query": "' + dax + '"}], "serializerSettings": {"includeNulls": "true"}}'
body = json.loads(query)
api_call = post_request(url_execute_query, header, body)

#Transform to Pandas Dataframe
result = api_call.content.decode('utf-8-sig')
result = result.replace('"results":[{', '')
result = result[:len(result)-2]
result = result.replace('"tables":[{', '')
result = result[:len(result)-2]
result = result.replace('"rows":[{', '')
result = result[:len(result)-1]
result = '[' + result
result = json.loads(result)
df_result = pd.DataFrame(result)
df_result = df_result.rename(columns={'Date[Fiscal Year]': 'Fiscal Year'})

print(df_result)

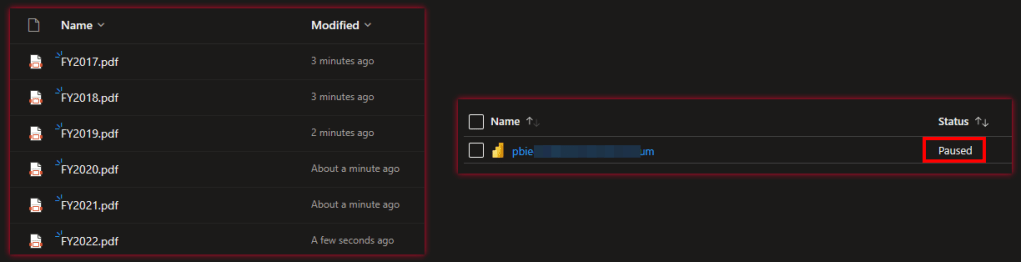
As we can see, I have six Fiscal Year values from 2017 – 2022.

As a next step, we need to call now the /ExportTo API for each Fiscal Year. Thus, I create a for each loop based on the Fiscal Year Dataframe (df_result). As we have to provide a body context in which we can specify the format as well as influence the parameters, I do specifically that. As a response to the call, we get a Export ID which we need later on to be able to export and save the report as PDF. Therefore, I store all of them in one Dataframe called df_export and print it out to make sure I get it for each Fiscal Year.

#Export Report for each value in Report Parameter
export_url = base_url + '/ExportTo'
export_id_list = []
parameter_value_list = []

for index, row in df_result.iterrows():
    current_value = df_result['Fiscal Year'][index]
    body = {
        "format": format,
        "paginatedReportConfiguration": {
            "parameterValues":[
                    {"name": "DateFiscalYear", "value": current_value}
                ]
        }
    }

    api_call = post_request(export_url, header, body)
    export_id = api_call.json()['id']
    export_id_list.append(export_id)
    parameter_value_list.append(current_value)

df_export = pd.DataFrame(list(zip(export_id_list, parameter_value_list)), columns=['Export ID', 'Parameter Value'])
print(df_export)

After we initiated the export for each Fiscal Year, we have to check the status. For that, I created again a for each loop based on the df_export Dataframe this time and check for each Export ID if the status is “Succeeded”. Until then, I print out the current Fiscal Year as well as the current status to have an overview of the current state.

#Get Export Status

for index, row in df_export.iterrows():
    current_export_id = df_export['Export ID'][index]
    current_parameter_value = df_export['Parameter Value'][index]

    url_status = base_url + '/exports/' + current_export_id
    status = ''
    while status != 'Succeeded':
        api_call = get_request(url_status, header)
        status = api_call.json()['status']
        print(status)
        print(current_parameter_value)

Once done, we can finally save our PDF as wished. As I save it in my case on my local machine, I use the os library but obviously you can save the PDF wherever you wish, for example in OneLake, ADLS Gen2, SharePoint, etc. To be able to do that, I once more created a for each loop on the df_export Dataframe and call the /exports/{id}/file API where {id} represents the Export ID from our previous step. Once I got the content, I save it to my local machine. By the way, I influence the file name by providing the current Fiscal Year value (see parameter file_name).

#Save report as PDF

for index, row in df_export.iterrows():
    current_export_id = df_export['Export ID'][index]
    file_name = df_export['Parameter Value'][index]

    url_save = base_url + '/exports/' + current_export_id + '/file'
    api_call = get_request(url_save, header)

    completename = os.path.join(path, file_name + '.' + format)

    with open(completename, 'wb') as f:
        f.write(api_call.content)

As a final result, we get for each Fiscal Year one PDF saved to our local machine!

The whole code looks as now as following.

#Import needed libraries
import requests
import json
import pandas as pd
import msal
import os

#Specify Parameters

#Service Principal
client_id = ''
client_secret = ''

#Tenant Specification
tenant_id = ''
authority_url = 'https://login.microsoftonline.com/' + tenant_id
scope = ['https://analysis.windows.net/powerbi/api/.default']

#Report Specification
workspace_id = ''
report_id = ''
dataset_id = ''
base_url = 'https://api.powerbi.com/v1.0/myorg/groups/' + workspace_id + '/reports/' + report_id
format = 'PDF'
body = {

    "format": format
}

#Report File Specification
path = ''

#Use MSAL to grab token
app = msal.ConfidentialClientApplication(client_id, authority=authority_url, client_credential=client_secret)
result = app.acquire_token_for_client(scopes=scope)

if 'access_token' in result:
    access_token = result['access_token']
    header = {'Content-Type':'application/json', 'Authorization':f'Bearer {access_token}'}
	
#Export Report for each value in Report Parameter
export_url = base_url + '/ExportTo'
export_id_list = []
parameter_value_list = []

for index, row in df_result.iterrows():
    current_value = df_result['Fiscal Year'][index]
    body = {
        "format":"PDF",
        "paginatedReportConfiguration": {
            "parameterValues":[
                    {"name": "DateFiscalYear", "value": current_value}
                ]
        }
    }

    api_call = post_request(export_url, header, body)
    export_id = api_call.json()['id']
    export_id_list.append(export_id)
    parameter_value_list.append(current_value)

df_export = pd.DataFrame(list(zip(export_id_list, parameter_value_list)), columns=['Export ID', 'Parameter Value'])
print(df_export)

#Get Export Status

for index, row in df_export.iterrows():
    current_export_id = df_export['Export ID'][index]
    current_parameter_value = df_export['Parameter Value'][index]

    url_status = base_url + '/exports/' + current_export_id
    status = ''
    while status != 'Succeeded':
        api_call = get_request(url_status, header)
        status = api_call.json()['status']
        print(status)
        print(current_parameter_value)
		
#Save report as PDF

for index, row in df_export.iterrows():
    current_export_id = df_export['Export ID'][index]
    file_name = df_export['Parameter Value'][index]

    url_save = base_url + '/exports/' + current_export_id + '/file'
    api_call = get_request(url_save, header)

    completename = os.path.join(path, file_name + '.' + format)

    with open(completename, 'wb') as f:
        f.write(api_call.content)

Please let me know if this post was helpful and give me some feedback. Also feel free to contact me if you have any questions.

If you’re interested in the files used in this blog check out my GitHub repo https://github.com/PBI-Guy/blog

Use Dynamic M Parameters in DirectQuery mode and Paginated Reports

Recently, I got a very interesting challenge from a customer of mine. In their use case, they have created a Power BI Report (and Dataset) in DirectQuery mode. On top, they have created a Paginated Report on the same Dataset, and integrated the pixel-perfect report through the out-of-the-box Paginated Report visual. Lastly, to improve performance, they used Dynamic M Parameters in Power BI to influence the query send back to Power BI. If you’re not familiar with this approach, Microsoft has a great documentation here: https://learn.microsoft.com/en-us/power-bi/connect-data/desktop-dynamic-m-query-parameters Now, they wish to pass the selected filter from Power BI to the Paginated Report within the Visual but unfortunately it’s failing with an error message like “You have attempted to pass an invalid parameter”. Let me explore what exactly is happening and how to resolve the issue in this blog post.

Prerequisites

In this scenario we need quite a few things:

  • A database which is DQ supported. In my case I’m going to use an Azure SQL DB
  • Power BI Desktop
  • Power BI Report Builder
  • Power BI Service
  • Power BI Pro license
  • M / Power Query know how

Setting up the environment

As mentioned, I’m going to use an Azure SQL DB on which I have a an AdventureWork Database 2019. In there, I’m going to connect to the SalesLT.Product table in DirectQuery mode from Power BI.

To do so, I select the Azure SQL Database Connector, pass my Server and Database name, choose DirectQuery, and past a simple SELECT statement in the Advanced Options.

SELECT p.[ProductID]
      ,p.[Name]
      ,p.[ProductNumber]
      ,p.[Color]
      ,p.[StandardCost]
      ,p.[ListPrice]
      ,p.[Size]
      ,p.[Weight]
      ,p.[ProductCategoryID]
      ,p.[ProductModelID]
      ,p.[SellStartDate]
      ,p.[SellEndDate]

FROM [SalesLT].[Product] p

Before loading my data, I hit the transform button to switch to Power Query. In there, I want to parametrize the Server and DB name. Further, for my test purpose, I want to use the dynamic M Parameter and pass the Product Number into my M. For that reason I create three Parameters in total using the CA-1098 value as current for my product number.

Once done, I select my Sales Table and right click on the “Source” step on the right hand side. In there, I can see that Native Query is greyed out and therefore not enforced. As we need Native Query folding, we have to customize our M a little bit. If you’re not familiar with Native Query folding, I can recommend the official Microsoft Documentation found here: https://learn.microsoft.com/en-us/power-query/native-query-folding

For some data sources the View Native Query is always greyed out as Power Query can’t identify if it is enabled or not. To make sure if Native Query Folding is enabled, trace your data source and see what query has been executed on it. Additionally, you can use Value.Metadata function in M to check if “IsFolded” is set to true or not.

Now, I switch to the Advanced Editor of Power Query and customize my code to, on one hand, use the Server and DB parameters, and enforce Native Query folding on the other hand.

In the screen shot below, you can see how I use my two parameters in the Sql.Databasse function of my first Source step. Afterwards, I created a new step called Query and pasted my SQL statement in there. I want to raise your attention to the WHERE clause here in which I point to my Product Number parameter with the default value “CA-1098” right now. Lastly, I have a third step called NativeQuery in which I enforce the Native Query folding by passing the Source, Query, and enforce it by setting EnableFolding to true.

let
    Source = Sql.Database
            (
                paramServer,
                paramDB
            ),
    Query = "
            SELECT p.[ProductID]
                ,p.[Name]
                ,p.[ProductNumber]
                ,p.[Color]
                ,p.[StandardCost]
                ,p.[ListPrice]
                ,p.[Size]
                ,p.[Weight]
                ,p.[ProductCategoryID]
                ,p.[ProductModelID]
                ,p.[SellStartDate]
                ,p.[SellEndDate]

            FROM [SalesLT].[Product] p

            WHERE p.[ProductNumber] = '" & paramProductNumber & "'",
    NativeQuery = Value.NativeQuery
                    (
                        Source, 
                        Query, 
                        null, 
                        [EnableFolding = true]
                    )
in
    NativeQuery

Now, my table shows only one row for the CA-1098 Product Number an Native Query is enabled.

Before we close Power Query, I need an additional table to list all my Product Numbers. For that, I just duplicate the SalesLT Product table, rename it to Product Number, and adjust the SQL Statement to a SELECT DISTINCT.

let
    Source = Sql.Database
            (
                paramServer,
                paramDB
            ),
    Query = "
            SELECT DISTINCT p.[ProductNumber]

            FROM [SalesLT].[Product] p",
    NativeQuery = Value.NativeQuery
                    (
                        Source, 
                        Query, 
                        null, 
                        [EnableFolding = true]
                    )
in
    NativeQuery

Now I can hit the Close & Apply button. Once loaded, I switch to the Model view, select the ProductNumber column from the Product Number table, enhance the advanced options, and choose to bind this field to the paramProductNumber parameter. Pay attention that the two tables are not connected via a relationship in my model.

I hit continue on the potential security risk message that pops up next. Let’s test if it works by switching the view to Report View, add a slicer visual with the ProductNumber field from the Product Number table, and add a table visual with some columns from the SalesLT Product. After selecting a Product Number in our Slicer, we see the corresponding item in our table – it works!

Next, I publish the Report and create a Paginated Report on top of the newly created Dataset. The report itself is pretty simple, including just one Table with four columns. The Data Source is my freshly created Power BI Dataset.

I created the Paginated Report Dataset through the Query Designer in following way and selected the Parameter Checkbox for ProductNumber.

Once the Dataset and Parameter have been created, I open the properties of the Parameter. In there, I make sure I don’t provide any default value as it’s not needed. Further, I make allow Multiple Values making sure I don’t have to change it later on as I wish to pass multiple Product Numbers in a later stage.

Now, when I run the Report and select CA-1098 it works and renders my table. But there is one big but right now. I only see one value in my drop down list.

The reason might not seen obvious at the first sight but it’s very reasonable at the end. Because I provided a default value in my Power BI Dataset it filters automatically down to just this one value. Paginated Report on the other hand only can render what the PBI Datasets provide, therefore I have to make sure to load everything somehow in Power BI Dataset while the filter / parameter still have to work. Nevertheless, let’s test the Paginated Report in Power BI through the out of the box visual to see what will happen. To do so, I publish the Paginated Report to Power BI Service, switch back to Power BI Desktop and add the Paginated Report Visual into it. I add the ProductNumber field to the visual, hit Connect to Report, select my newly published Paginated Report, and hit Set Parameter. In there, I configure the Power BI field to map to my Parameter and hit See Report.

As expected, I get an error. The reason is I try to pass the “BB-7421” value to Paginated Reports, but it’s only aware of the “CA-1098” and therefore it throws an error.

Let’s fix it in my WHERE clause of the SQL Statement in which I filter down to get only one value right now. I need a way to pass “All” as default value to get all values back but once I select a value in my slicer, it should filter it down. On top, it should be multi value aware. For that, I adopt the SQL statement in SQL Server Management Studio and replace the = with “IN” and set the statement in brackets. Further, for testing purpose in SSMS, I declare a parameter and set it to “All”. Lastly, I create a CASE statement in which I check if the parameter is All and if so, then all values from ProductNumber column should be selected, otherwise only the value itself should be taken.

DECLARE @selectedProductNumber VARCHAR(50) = 'All';

SELECT p.[ProductID]
,p.[Name]
,p.[ProductNumber]
,p.[Color]
,p.[StandardCost]
,p.[ListPrice]
,p.[Size]
,p.[Weight]
,p.[ProductCategoryID]
,p.[ProductModelID]
,p.[SellStartDate]
,p.[SellEndDate]

FROM [SalesLT].[Product] p

WHERE p.ProductNumber IN (CASE WHEN @selectedProductNumber = 'All' THEN ISNULL(ProductNumber, '') ELSE @selectedProductNumber END )

After testing if the SQL statement works as expected by changing the parameter to All and different Product Numbers, I copy and paste the new SQL Statement to M in Power BI and update it to point to my parameter in Power BI. Be aware, that the DECLARE Statement is not needed here.

let
    Source = Sql.Database
            (
                paramServer,
                paramDB
            ),
    Query = "
            SELECT p.[ProductID]
                ,p.[Name]
                ,p.[ProductNumber]
                ,p.[Color]
                ,p.[StandardCost]
                ,p.[ListPrice]
                ,p.[Size]
                ,p.[Weight]
                ,p.[ProductCategoryID]
                ,p.[ProductModelID]
                ,p.[SellStartDate]
                ,p.[SellEndDate]

            FROM [SalesLT].[Product] p

            WHERE p.ProductNumber IN (CASE WHEN '" & paramProductNumber & "' = 'All' THEN ISNULL(ProductNumber, '') ELSE '" & paramProductNumber & "' END )",
    NativeQuery = Value.NativeQuery
                    (
                        Source, 
                        Query, 
                        null, 
                        [EnableFolding = true]
                    )
in
    NativeQuery

If I now change my paramProductNumber value the table reacts and if I put All into it, I see all values – perfect!

Before publishing, there is one thing left. We have to make the Parameter multi value aware so not only single values can be passed. To do that, we hit Close & Apply and switch to the model view. In there, I select the ProductNumber field and enable Multi-Select.

Now, switching back to the report view, I got another error.

The reason for this error is again the M code as the Parameter is a Text and therefore Power Query expects a text value. But passing multi values converts the parameter to a List and it can not be matched, that’s what the error says at the end. To fix it, let’s go back to Power Query and open the Advanced Editor of the SalesLT Product table. In there, I add at the top a new step which checks if the parameter is of type list, and if so, convert it to text separated by single quotes. If not, it’s just passing the same value to the selectedProductNumber step. On top, I remove the single quotes in my WHERE clause as I’m providing them in the selectedProductNumber step already and change the reference now to my newly created step.

Now, I just click Close & Apply button, delete the table visual as it’s not needed anymore, and publish my report. Don’t get confused because of the error message the Paginated Report visual is still showing – we have to first update the Dataset in the Service to see the changes.

After successfully publishing the Power BI Report, I just hit apply changes in the Paginated Report Visual and see that my selection is now passing through! Even if I select multiple values, I can see the expected result.

Please let me know if this post was helpful and give me some feedback. Also feel free to contact me if you have any questions.

If you’re interested in the files used in this blog check out my GitHub repo https://github.com/PBI-Guy/blog

Export Paginated Reports automatically in a low-code way without Power BI Premium

From time to time I got asked how customers can export Paginated (or Power BI) Reports automatically to store them e.g. in OneDrive or any other location. One way is obviously to do it manually, but we’re looking for an automatic way. So why not use the out-of-the-box Subscribe button within Power BI Service? Because it will send you an email and you can’t decide to store it somewhere else. Luckily, Power BI offers an API to achieve what we’re looking for. But what if I’m not a developer and don’t know how to write code e.g. in PowerShell or Python? No worries, Microsoft got you covered with Power Automate!

Prerequisites

There are a few things which are needed to be able to follow this approach. First of all, Paginated Reports are part of a Power BI Pro license BUT if you wish to export a Paginated Report automatically, you still need a capacity (Premium or Embedded) to be able to do so. Reason is to make sure the end user is licensed in a proper way because through Premium the end user requires only a Free license. If you try to export a Paginated Report through the API backed up with a Pro license, you’ll get an error as you can’t make sure the end user also have a Pro license. That’s the reason why a capacity is needed. But buying Power BI Premium just to be able to export PDFs automatically is probably an overhead. Therefore we’re looking for a more cost-effective way which can be achieved with Power BI Embedded. Why? Because Power BI Embedded can be paused and it will not generate any cost at all! So we can turn it on just when needed, export our PDFs, and shut it down afterwards! Keep in mind while Embedded is paused the Reports in the associated workspaces will not be accessible.

So here’s a list of what we need:

  • Power BI Pro license
  • Power BI Embedded
  • Power Automate license
  • Service Principal with sufficient permission
  • Basic understanding of REST API
  • Basic know-how of DAX

Because we’re going to call the REST API to start and pause our Power BI Embedded capacity with Power Automate, the HTTP connector is needed which is Premium (as of February 2023). Therefore the O365 included licenses is not enough as “only” Standard Connectors are included.

If you’re interested in Power Automate Licensing please check the actual guide. Prices can be found here: https://powerautomate.microsoft.com/en-us/pricing/

Setting the scene

For my example I’m going to reuse the Sales Analysis Paginated Report from the Paginated Report in a Day course. I want to create one PDF for each Fiscal Year automatically and save each PDF into OneDrive.

I published the Report to my “Demo” workspace which is backed up by an Embedded Capacity. Creating an Embedded Capacity is straight forward through the Azure Portal. A how-to guide can be found here: https://learn.microsoft.com/en-us/power-bi/developer/embedded/azure-pbie-create-capacity, For our example the smallest (A1) SKU is enough.

Further, I prepared a folder in OneDrive called “Demo” where I wish to save my PDFs.

Let’s get started with Power Automate

Once I logged in into Power Automate via https://flow.microsoft.com/en-us I select “+ Create” on the left hand side and select “Instant cloud flow”. This means I can trigger my flow manually which is handy during development. Once done, I can change the trigger to e.g. a schedule like every Monday morning at 7am. After the new window pop up, I name my Flow as wished (PBI Guy – Save PDF from Paginated Reports), select “Manually trigger a flow”, and hit the Create button.

Let’s first test if I can save a PDF export into OneDrive and focus on starting & pausing the Capacity in a next step. So our first step is to get the PDF and then save it into OneDrive. To create a new action, just select the + New Step. Now, search for Power BI and select the build-in Power BI Connector. Once selected, scroll and search for “Export To File for Paginated Reports”.

Afterwards, we have to configure our action by selecting our Workspace, Report, wished Export Format, and specify our Parameter which is Fiscal Year in this case. Be cautious by naming the Parameter as you need the internal name, not the label of the Parameter. Therefore you have to open the Paginated Report with Report Builder and check the internal Parameter name.

In my case it’s called “DateFiscalYear”.

Now that I have all needed details I switch back to my Flow and configure the action by selecting the Workspace (Demo), afterwards a list of my Paginated Reports will appear where I select the Sales Analysis, and choose my wished Export Format. Per default it’s PDF but you can also choose another option if you wish. Next, I provide the Parameter name and add a Value (FY2019) for testing purpose.

Next, I add a New Step by hitting the button, search for OneDrive, select OneDrive for Business, and select “Create File” as new action.

Afterwards, I just configure the Path by selecting the small folder icon and browse to my wished destination. I add FY2019.pdf as file name and choose the File Content from the dynamic content pane as File Content for my action. If you somehow don’t see the dynamic content, just hit the button at the bottom right to expand it.

Let’s test the flow and see if a PDF will be saved into OneDrive. To do so just click at the top right on the Test button. A new pane will appear, just select Manually and hit Save & Test.

Running it the first time I need to sign in to the different connectors I’m using (Power BI and OneDrive). Just Continue to do so and hit as last step Run Flow. Keep in mind that the Power BI Embedded capacity has to run otherwise you’ll get an error as the Report is not available.

After approx. 1 Minute our Flow will finish and checking OneDrive I can see a new PDF has been created. Great! Opening it shows me that even the Parameter FY2019 has been passed and I see only FY2019 data – awesome! But now let’s parametrize it a little so my Flow will create a PDF for each FY available and not only FY2019. To do so I switch to Edit mode by selecting the appropriate button at the top right and add a new step right after our manual trigger by clicking on the + sign. I again search for Power BI and choose “Run a query against a dataset” as action. In here I select again my Demo workspace and Sales Analysis Dataset. The idea is now to run a DAX statement against the Sales Analysis Dataset to get all FY values which we will reuse to generate our PDF and save it. I quickly open DAX Studio, connect to my Dataset, and generate an EVALUATE DAX statement to get all FY values of my date table.

EVALUATE DISTINCT('Date'[Fiscal Year])

ORDER BY 'Date'[Fiscal Year]

I copy and paste the whole DAX statement into the query text of the action in my flow.

Again, to test if it works, I rerun the Flow and check the Output of my new action. As I can see there are different FY values as expected – perfect! I copy the whole output as we will need it for our next step.

I switch back to Edit mode and add a new step between the two Power BI actions. I search for JSON and select the Parse JSON action. Next, I add into the Content field the “First table rows” dynamic content from my previous step. Lastly, I hit the Generate from sample button and paste the result I copied a few seconds ago. This will automatically create a schema.

This step is needed to be able to get each value and reuse it afterwards to create for each FY a PDF. Before I move to my next step, I want to rename my Actions making sure by just reading them each user can understand what is happening. To do so, just select the three dots for each step and rename it accordingly. In my case I renamed the steps as following.

Now, let’s parametrize our Export to reuse the FY values dynamically. To do so, I select the Export action, scroll down to ParameterValues value section, delete my hard coded FY2019 and add Date[Fiscal Year] as dynamic content from my previous step. This will automatically create a “Apply to each” around my step.

Next, I drag and drop the “Save PDF into OneDrive” action into the Apply to each container and position it below the Export action. Lastly, I delete the hardcoded file name and again add the Date[Fiscal Year] dynamic content and add .pdf at the end. Otherwise it will not be saved as such.

Again, let’s test our flow and check the result. After roughly 4 minutes our flow has finished and I see 6 different PDFs in my OneDrive, one for each FY – awesome!

Now we have to make sure to pause the Power BI Embedded Capacity once the job is done. Also, we want to make sure it starts once the flow has started otherwise the PDFs can’t be generated. Let’s first focus on starting the capacity.

The official Microsoft Documentation shows the necessary REST API call to start resp. resume the capacity. There are different parameters which are needed:

  • subscriptionId
  • resourceGroupName
  • dedicatedCapacityName

The full POST request looks as following:

https://management.azure.com/subscriptions/{subscriptionId}/resourceGroups/{resourceGroupName}/providers/Microsoft.PowerBIDedicated/capacities/{dedicatedCapacityName}/resume?api-version=2021-01-01

So let’s create these three parameters in our Flow to make it easier to use and reuse them. After switching back to my Flow I add a new action right after the trigger to create the parameters as a first step. I search for Variable and select “Initialize Variable”. I name the first variable “Subscription ID”, make it a String type and enter my Subscription ID as Value. If you don’t know the Subscription ID, just check it in your Azure Portal by selecting the Embedded Capacity.

I rename my action from Initialize variable to Define Subscription ID Variable and redo the steps for Resource Group Name and Dedicated Capacity Name Variables.

Now, let’s try to call the REST API with the HTTP action. Again, just hitting the + Button after my variables and search for HTTP. Once selected, I can configure it. The Method we have to use is POST based on the documentation. In the URI field I copy and paste the whole REST API call. Once copied, I delete the general parameter from the URL (everything between and including the {}) and replace it with the previously created variables from the dynamic content pane. In the Headers section, I add Content-Type as key and application/json as value. Because the REST API is not publicly available we have to log in somehow to be able to call it. Therefore, we can expand the advanced options and choose our authentication method. As I work mostly with Service Principals, I select Active Directory OAuth. Once selected, there are a few more things to fill out.

In one of my previous blog posts I showed how to create a Service Principal (https://pbi-guy.com/2022/03/10/power-bi-and-activity-logs-with-python/) and also did a walk-through how to give the sufficient permission to the SP to start and pause the Embedded Capacity (https://pbi-guy.com/2022/09/22/assign-power-bi-workspaces-to-a-capacity-automatically/).

Let’s see how we can get the needed details. The Client ID as well as the Tenant ID can be found in the overview of the Service Principal.

The Secret can be generated from the Service Principal or, like in my case, I have it stored in Azure Key Vault so I add a new step before the HTTP Call to get the secret out of it. To do so, again, I hit the + button, search for Azure Key Vault, and select Get Secret. In there, I can select the different Service Principals I have access to but because I have to provide the Client ID in the HTTP request as well, let’s parametrize it and create a variable one step before called Client ID. Further, let’s add a variable for the Tenant ID as well. Once done, I can now use the variable within my Get Secret action by selecting Enter custom value and select the Client ID variable.

Further, I can now add the variables to the associated places in my HTTP action and use the value of my Secret action. Lastly, Audience have to be added which is in this case https://management.core.windows.net.

Let’s try and run our Flow to test it. If everything is set up correctly, you’ll get an error because the Power BI Embedded capacity is already running and you can’t start it again. Therefore following error will appear:

This means we need to check the status and, if it is paused, call the API, otherwise skip this part. And how can we check the status? Through REST API! Power BI offers an admin call to get all capacities (see https://learn.microsoft.com/en-us/rest/api/power-bi/admin/get-capacities-as-admin) We’re going to call it and check the status. So let’s create another HTTP request above the current one. This time, according to the documentation, we use a GET method and paste https://api.powerbi.com/v1.0/myorg/admin/capacities into the URI field. As headers we use again Content-Type as key and application/json as value. To be able to authenticate I’m going to use again my Service Principal and luckily, I have everything stored in variables so I can just put them into the right place. Only the audience will change this time as we’re connecting to Power BI now, not to Azure, therefore I have to use https://analysis.windows.net/powerbi/api for it.

If I run the Flow now, it will still fail at the second HTTP action, but I get the result of the Power BI REST API and can check what the status is of my Embedded Capacity.

As a next step, I want to filter the result to only my capacity and extract the status. To be able to do so, I have to parse the body again to JSON and filter it afterwards. So, I copy again the whole body from the HTTP request and switch back to Edit mode. Once there, I add a new step after the Power BI REST API call and search for JSON and select Parse JSON. As content, I add the Body and generate the schema from a sample again by pasting it into the window after I hit the Generate from sample button. Now we have generated an Array which can be filtered. Therefore as next step I search again for Filter Array and select it. I put value from my previous step into From, select displayName as value on which I wish to filter and say it should be equal to my variable Capacity Name.

Now, that we filtered our result down to our desired capacity, we can do a check on the status. Let’s add a new step and search for Condition. In there, I add state from my previous step and configure is equal to “Active”. Once state is added as dynamic content, an Apply to each container will be automatically created. Just leave it as it is.

As next step, I drag and drop the HTTP request to start my capacity into the “If no” stream. This means, if the status is active, I don’t have to call the API to start it but if it’s not active, I would like to start it via REST API. As Power Automate will not wait until the Capacity is running and just continue to the next step, I want to make sure the capacity is in the desired state by adding a delay action of 30 seconds. Obviously, I could create a loop calling the Power BI REST API checking the status and, once changed to active, to proceed, but I’m not interested in the most performant way to execute this Flow but rather in an efficient, low-code way. Therefore the easiest method is to just add a delay.

Let’s one more time test our Flow making sure it’s working as expected. You’ll see, because the capacity is still running, it will go the “If yes” path and not call the REST API this time to start it. Therefore no error occurred and the PDFs have been generated again – great! And as you see the PDFs have been overwritten as we’re using the same name. This is expected behavior.

As a last thing we have to make sure now that our capacity will pause once the Flow is done. Again, checking the documentation there is almost the identical REST API call to pause resp. suspend the capacity. All we need to do is change “Resume” to “Suspend”. To be as sufficient as possible, let’s go to our Start Power BI Embedded action, hit the three dots, and choose Copy to my clipboard.

Now, I hit the + New step at the bottom of my flow, switch to My clipboard and select the copied action.

All I have to do now is to rename it and adjust the URI. What a time saver!

That’s it! Let’s test our final Flow by running it again. After roughly 4-5 minutes the Flow is done and I see on one hand that new PDFs have been created in my OneDrive and on the other hand my Power BI Embedded Capacity is now paused.

Let’s run it again making sure if the capacity is paused that the Flow will start it, still create the PDFs, and then shut it down. And again, after like 5 minutes it was successful. Checking the condition action in the Flow, we see the expression was false (capacity status is not active) and it went the right path to start it – perfect! During the run you could also refresh the page in Azure Portal to check the status of your capacity and you’ll see how it changed from Paused to Active and back to Paused.

The really last thing now is to delete the manual trigger at the top and replace it with what’s needed. E.g. a Schedule to run it every Monday 7:00am like in this example. Obviously, you can also choose other triggers depending on your needs. Keep in mind that Power BI offers a Power Automate visual out-of-the-box which can be used to trigger our Flow as well – from insights to action!

Please let me know if this post was helpful and give me some feedback. Also feel free to contact me if you have any questions.

If you’re interested in the files used in this blog check out my GitHub repo https://github.com/PBI-Guy/blog

Power BI and Paginated Reports – beyond usual use

A lot of customers are asking me what are the differences between Power BI and Paginated Reports, why should they use one OR the other. My answer is mostly: It’s not one OR the other, why not combine and get the most out of both worlds?! I suggest in many cases that Power BI can be used as interactive dashboard “entry-tool” for end users to analyze dynamically their data. But once a pixel-perfect report should be created as PDF (it’s mostly PDF so we’re going to focus on this format) Paginated Reports are simply better. So why not creating a button within your Power BI report to take all the selected filters automatically and create out-of-the-box a Paginated Report PDF print-out? Most customers are first wondering that this kind of scenarios are possible and of course wondering how it can be done. Let me walk you through how to add such a button within a Power BI report in this blog post.

Prerequisites

  • Power BI Report
  • Paginated Report
  • Power BI Desktop
  • Power BI Report Builder (recommended)
  • Power BI Premium / Power BI Premium per User / Power BI Embedded
  • Basic understanding of both worlds

I already have a Power BI and a Paginated Report ready to combine it. If you’re not familiar how to create a Paginated Report or from where to get a simple demo file I can highly recommend the Power BI Paginated Reports in a Day Course. In this course you’ll learn the differences between Power BI and Paginated Reports, how to start and build your first report, and how to publish it afterwards to Power BI.

Further Paginated Reports are only supported with Premium. Therefore you will need a Power BI Premium capacity, Premium per Use license, or Power BI Embedded.

How to

The very first thing we need to do is to publish our Paginated Report to Power BI to get the unique ID of the report from the Service. In my case I open the RDL file with Power BI Report Builder and publish it to a workspace backed up with a PPU license. I name it Sales Analysis.

Once done the report will be available in Power BI Service. If we open it we’ll see the URL pointing to our specific workspace with a unique ID (1a8b6910-c4a2-4611-ae75-5d0b968eb6d3) and pointing to our Sales Analysis Paginated Report which has as well a unique ID (66a1a70a-89cf-4d48-80c1-39d766f9892b). This means we can use this URL to get to our just published Paginated Report.

If we check the Microsoft Documentation about Power BI and how the URL is build (see https://docs.microsoft.com/en-us/power-bi/paginated-reports/report-builder-url-parameters) we see that the URL can be enhanced to provide values for parameters, to provide commands to get a specific format, and many more. So before building something in our Power BI report let’s try the URL to understand what’s possible.

Let’s first try to give a value to the parameter. To initialize a parameter we have to add “?rp:parametername=value”. In our case the internal parameter name of the Paginated Report is called DateFiscalYear and can be checked in Power BI Report Builder. Checking the properties we also see that the parameter is a data type text.

If we’re looking for possible values we can check the “Available Values” and see if a query is used or something is hardcoded within the parameter settings. Alternatively we can also open the Report in Power BI Service and check the drop down list of the Parameter. If we do so we can see that following values are expected.

Let’s try to build the URL now with what we got so far:

URL to Reporthttps://msit.powerbi.com/groups/1a8b6910-c4a2-4611-ae75-5d0b968eb6d3/rdlreports/66a1a70a-89cf-4d48-80c1-39d766f9892b
Initializing Parameter?rp:
Parameter NameDateFiscalYear
Parameter ValueFY2019
Whole URLhttps://msit.powerbi.com/groups/1a8b6910-c4a2-4611-ae75-5d0b968eb6d3/rdlreports/66a1a70a-89cf-4d48-80c1-39d766f9892b?rp:DateFiscalYear=FY2019

If we call the URL now the parameter is automatically set to FY2019 and the report is loaded.

Let’s go further and try to get a PDF automatically. To do so we only need to add “&rdl:format=PDF” at the end of our URL. The “&” symbol combines different commands and to get a PDF automatically the rdl:format=PDF is necessary. Therefore our whole URL looks now as following:

https://msit.powerbi.com/groups/1a8b6910-c4a2-4611-ae75-5d0b968eb6d3/rdlreports/66a1a70a-89cf-4d48-80c1-39d766f9892b?rp:DateFiscalYear=FY2019&rdl:format=PDF

If we call this URL Power BI will automatically generate a PDF.

So far so good! Now that we understand how the URL of a Paginated Report works and how we can modify it let’s try to implement it in our Power BI Report.

After opening the Power BI Report in Power BI Desktop we can add a simply DAX measure with our hardcoded URL to call the Paginated Report.

Paginated Report URL = “https://msit.powerbi.com/groups/1a8b6910-c4a2-4611-ae75-5d0b968eb6d3/rdlreports/66a1a70a-89cf-4d48-80c1-39d766f9892b?rp:DateFiscalYear=FY2019&rdl:format=PDF”

Once added make sure to mark it as Data Category Web URL.

If we add now the measure to our report we see our hardcoded URL. If we click on it the Paginated Report will open. Unfortunately it’s not “connected” with our Power BI Report so far. Meaning if I change the Slicer for example to FY2020 the URL will still point to FY2019. Let’s fix this with some DAX magic.

I add a new Measure to get the selected value of the slicer. In this case I use following formula:

Selected Fiscal Year = SELECTEDVALUE(‘Date'[Fiscal Year])

Now I just replace the hardcoded FY2019 from the first Measure with my second Measure. The DAX Measure looks now as following:

Paginated Report URL = “https://msit.powerbi.com/groups/1a8b6910-c4a2-4611-ae75-5d0b968eb6d3/rdlreports/66a1a70a-89cf-4d48-80c1-39d766f9892b?rp:DateFiscalYear=” & KPIs[Selected Fiscal Year] & “&rdl:format=PDF”

Now every time I select another FY my URL will automatically adopt. That’s very simple with a single selection but what if I wish to have a multi selection, will it still work? Let’s try it out. But before testing the URL we need to make sure the Slicer is enabled for Multi Selection as well as the Parameter in our Paginated Report. Therefore I change the settings of both.

Don’t forget to republish the Paginated Report once the Property has been modified.

Let’s test our URL now in Power BI if we select two FY. I added the Paginated Report URL Measure into a Table visual to see it and select two different FY. Unfortunately the URL do not show both years, even worse it just disappeared. The reason behind is that the SELECTEDVALUE function expects one value.

Luckily we can also give an alternative to the SELECTEDVALUE function in which we can concatenate multiple values. To make sure we got the each value just once we need to use the DISTINCT function as well. Our Selected Fiscal Year Measure looks now as following.

Selected Fiscal Year = SELECTEDVALUE(‘Date'[Fiscal Year], CONCATENATEX(DISTINCT(‘Date'[Fiscal Year]), ‘Date'[Fiscal Year]))

Unfortunately it combines now FY2019 and FY2020 into one string and the URL contains now FY2019FY2020 which will not work. Even if we separate the two fiscal years with a comma or something else it will still not work as Paginated Report will recognize it as one value (e.g. “FY2019, FY2020” is one value and the report will not load). Therefore we need to add for each value the parameter again like in the Documentation described (see https://docs.microsoft.com/en-us/power-bi/paginated-reports/report-builder-url-parameters#url-access-syntax). The syntax looks as following:

powerbiserviceurl?rp:parametername=value&rp:parametername=value

In our case this means we have to have rp:DateFiscalYear=FY2019&rp:DateFiscalYear=FY2020 after the question mark. Let’s adjust our Selected Fiscal Year Measure to get the right URL needed. If we closely look to the syntax we see that the Delimiter can be specified. We’re going to use this and add “&rp:DateFiscalYear=”. In this case every time two ore more values are selected the values will be separated with the right expression. Our final DAX measure looks now as following:

Selected Fiscal Year = SELECTEDVALUE(‘Date'[Fiscal Year], CONCATENATEX(DISTINCT(‘Date'[Fiscal Year]), ‘Date'[Fiscal Year], “&rp:DateFiscalYear=”))

We can also see that the URL is changing dynamically based on the FY selection. If we click now on the URL the Paginated Report will open with the two FY selected and print out a PDF automatically.

Our last step is now to create a button in our Power BI Report and publish it afterwards.

In my case I choose the Pentagon Row shape and add it into my report. Of course you can modify it as wished or even use a visual instead of a shape / button to achieve the same result (open the paginated report).

Position the shape and configure it as needed. Lastly modify the Action property, set the Type to Web URL and configure our DAX Measure to be used as Web URL.

Now just publish the Power BI Report and use the button to open the Paginated Report based on your Slicer selection in Power BI.

Conclusion

As we see we can use Power BI as entry point and use it to set filters to open a Paginated Report afterwards. Due to the flexibility of the Paginated Report URL we can also specify in which format the report should be exported. This could also be a dynamic selection in Power BI. There are further integration possibilities thanks to the Paginated Report Visual in Power BI to display a Paginated Report directly in Power BI.

Please let me know if this post was helpful and give me some feedback. Also feel free to contact me if you have any questions.

If you’re interested in the files used in this blog check out my GitHub repo https://github.com/PBI-Guy/blog